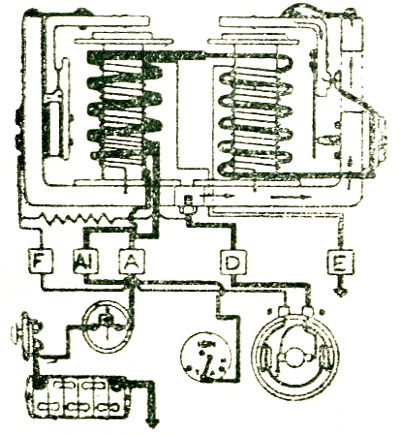
Charging circuit. |
Charging Circuit
The main charging circuit carries current from the generator / alternator to the battery. The circuit can be traced below; the current flows from the generator armature to the "D" terminal on the generator. This terminal is connected to the "D" terminal at the control box, and a metal connecting strip joins the "D" terminal to the "L" shaped regulator frame, causing the frame to be at generator potential. Heavy lines show the main charging and load circuits.
Auxiliary Circuits
The "A2" terminal is connected to "Al" through a 35 amp. fuse marked "AUX". Any accessories connected to this terminal will be fed from the battery through the ammeter, and will have a fuse in the circuit. Terminal marked "A3" is connected to the coil side of the ignition switch so that it will only be fed when the ignition is switched on. There Is no fuse in this circuit. Terminals marked "A4" are connected to "A3" by a 35 amp. fuse marked "AUX.IG". Accessories connected to "A4" will only operate when the ignition is switched on, and will have a fuse in the circuit.
Adjustment of the Regulator
The only adjustment normally needed to be made to the regulator is to the open circuit voltage setting. A high grade moving coil voltmeter (reading to 30 volts with half volt divisions) must be used for this purpose, and the regulator must be disconnected from the main circuit. When the cut-out points close, the current is able to flow through the series winding of the cut-out and through the regulator series winding to the "A" terminal. The current then passes through the battery by way of the ammeter; the circuit is completed through the chassis fnme of the vehicle and so to the earthed brush of the generator. It should be noted that the starter switch terminal shown in the circuit is used only as a convenient junction for the wiring.
Load Circuit
The current for the load circuit is taken via a junction on the series turns to terminal "A1" and from there to the main lighting and ignition switch. The regulator can be isolated from the main circuit by inserting a piece of thin card between the cut-out points. It is recommended, however, that the cables connected to the terminals marked "A" and "Al" be withdrawn and joined together for this purpose. Connect one lead of the voltmeter to the "D" terminal of the generator and the other lead to the generator-end bracket or other convenient point at chassis potential.
Slowly increase the speed of the engine until the voltmeter needle "flicks" and then steadies; this should occur at a voltage reading between the limits given in the appropriate section of this publication giving the open circuit voltage settings for all model regulators. When the generator is run at a high speed on open circuit, it builds up a high voltage, therefore, when adjusting the regulator, do not run the engine up to more than half-throttle or a high voltmeter reading will be obtained which will not be a true indication of the correct open circuit voltage setting.
If the voltage at which the reading becomes steady occurs outside these limits, the regulator must be adjusted. Release the locknut holding the the adjusting screw, and turn the screw in a clockwise direction to raise the setting, and anti-clockwise to lower the setting. For 12 volt sets, approximately one quarter turn of the screw will give a variation of one volt in the open circuit voltage setting. Tighten the locknut after adjustment is completed, and remake connections to terminals "A" and "A1".