The Anti-Sway Bar
The anti-roll bar (or stabilizer bar) is an established feature of
suspension design and is found on just about every modern day car - and plenty of classic cars too. Unless a car is involved in an accident the anti-roll bar is unlikely to require any attention throughout the life of the car but, occasionally, the mounting bushes may need replacement if they become worn or damaged. When a car is driven into a corner above a certain speed (which will vary from car to car), centrifugal force makes it lean outwards from the curve of the bend. This results in a transference of weight which causes a degree of roll in the car body.
The function of the anti-roll bar is to stiffen the
suspension so that it resists this sort of action and makes the car less prone to extreme body roll. An anti-roll bar is basically a steel torsion bar with each end bent at an angle that may vary from 60 to 90 depending on the type of car to which it is fitted. It is mounted transversely and, in most designs, interconnects the lower
suspension arms. As the outer
suspension arms move upwards and the inner arms move downwards, the anti-roll bar is placed under torsion. The thickness of the bar determines the amount of resistance to roll.
Front Suspension Anti-Roll Bars
Most modern cars are fitted with an anti-roll bar on the front
suspension and there are two mounting methods in common use plus a third which is relatively rare. With the first method, the anti-roll bar is mounted on either the chassis, the sub-frame, or some other part of the car's structure and is held in position transversely by two cup-shaped clamps. Each end of the bar is then attached to a short drop link which is in turn attached to the lower
suspension arm. The upper end of the drop link usually passes through a horizontal eye on the end of the anti-roll bar, while the lower end is connected to the
suspension arm in the same way, or by a vertical rubber bush and a through-bolt, or by a rubber-lined ball joint.
The second mounting method uses the anti-roll bar as a
suspension link. This type of design is widely incorporated on cars fitted with MacPherson strut
suspension, such as the
Ford Escort and
Capri Mk I, the Fiat 128 and
Ritmo models and some Japanese models. The anti-roll bar is mounted to the chassis or sub-frame in the same way as the first type, but each end of the bar passes through a rubber-insulated eye in the lower
suspension arm.
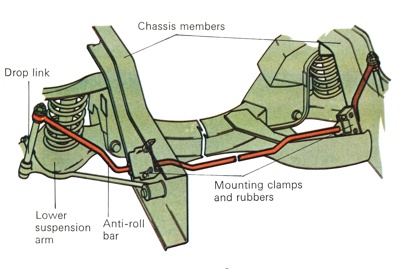
Anti-Roll Bar as used on the Ford Cortina. It was attached by clamps and a pair of drop links.
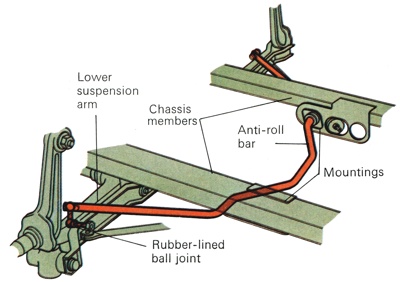
Anti-Roll Bar as used on the Morris Marina. It used rubber-lined ball joints instead of the drop links as shown above.

Anti-Roll Bar as used on MacPherson strut suspension setup. The ends of the bar usually pass through the lower suspension arms.

Anti-Roll Bar where the bar is clamped to the lower wishbones and is not mounted on the chassis at all.
Anti-Roll Bar as used on the Ford Capri MkII. The bar was mounted on the axle and projected forward to bolt to the chassis.

Anti-Roll Bar as used on the Renault 16. The bar was clamped to suspension arms and was not mounted to the chassis. |
Rear Suspension Anti-Roll Bars
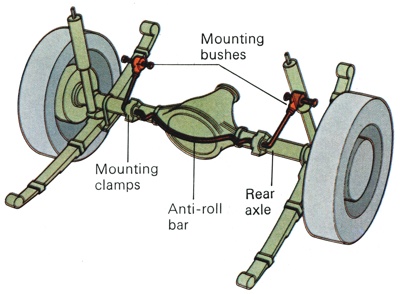
Relatively few older cars are fitted with anti-roll bars on the rear
suspension but the attachment methods are similar to those used on the front
suspension. On the
Fiat 124, for example, the transverse section of the anti-roll bar is clamped to the chassis and rubber-bushed drop links connect it to the rear axle casing. On alternative designs the anti-roll bar may be mounted on the axle casing itself with a bend incorporated in the bar in order to clear the final drive housing. With this type of mounting the ends of the bar usually project forward. They can then be attached to drop links which are in turn mounted on the chassis, or they may pivot on rubber bushes attached to the chassis as on the Ford Capri II and the
Morris Marina Mark II.
Checking For Wear In The Mounting Rubbers
Normally anti-roll bar insulating rubbers last a long time, so you should carefully check the rubbers on your car before undertaking any dismantling procedures. If they are badly worn you will most probably hear a rattle from the
suspension, particularly over rough surfaces, which should alert you to examine the condition of the rubbers. You may also find that the directional stability is reduced. To make a visual check you need to disconnect the battery and jack the car up, placing axle stands under the body or the sub-frame so that there is no load on the
suspension or the anti-roll bar rubbers. When you are confident that the car is securely supported you can examine the rubbers. If they appear to be cracked it is a sign that they have perished and therefore that they should probably be replaced.
Next, make a physical check by pulling on the anti-roll bar and then the
suspension arm. Listen for any knocks and feel for any movement. Renewal is relatively simple but you may need the help of an assistant because the anti-roll bar should be thought of as a spring and it may therefore require a little force to line it up with any locating holes. A supply of clean brake fluid or some special rubber grease may also be useful to help slide the new rubbers into place. You will also require a complete set of replacement rubbers. In some cases you may also need new drop links if the original items are damaged in any way.
Servicing Front Suspension Anti-Roll Bar Rubbers
In some cases the anti-roll bar rubbers can be changed without having to remove the bar completely. If you work on one side of the anti-roll bar at a time, disconnecting it, changing the rubbers and then re-fitting it, you can avoid the need to remove the unit and will save yourself extra work. Where the anti-roll bar is used as a
suspension link, for example the
Ford Escort, you will have to remove it in order to change the rubber bushes in the
suspension arms. The first job is to remove the bolts or nuts holding the clamps to the car's chassis or sub-frame. In nearly all cases these clamps are shaped like bearing caps with two bolts holding each to the flat surface of the car. The best policy to follow if a bolt is rusted is to apply penetrating oil and leave it to soak in overnight.
On the Morris Marina Mk II the anti-roll bar was added to the specification after the car was put into production so it was impractical to mount the clamps in this way. Therefore, the bushes are installed in tubular housings with flanged ends which are bolted to plates that extend downwards from the body longitudinal members. Here, the first job is to undo the two nuts and bolts on each housing. Where the anti-roll bar is fitted with drop links, replacement of the rubbers is easier as the complete unit does not have to be removed. Cars fitted with this type of anti-roll bar include the
Chrysler Avenger,
Chrysler Alpine,
Hillman Hunter and Horizon,
Simca 1301/
1501 and
1100, the
Morris Marina Mk II,
Renault 12 and
Renault 16, various
Citroen cars, most
Jaguars, the
Triumph Dolomite, some
Vauxhall and
Opel models and the
Ford Cortina TC,
Ford Granada, some
Holden models, the
Ford Falcon and many Japanese cars.
On the above cars there are three common types of drop link between the bar and the
suspension arm. One has a rubber-lined ball joint, a second uses a vertically-positioned eye with a rubber bush and through-bolt and the third has one threaded end which protrudes through an eye in the end of the anti-roll bar. The third type uses plain disc-like rubber bushes on either side of the anti-roll bar eye and each bush is protected by a metal saucer. To prevent the bushes becoming too compressed if you over tighten the nut on the threaded portion of this i type of drop link a metal sleeve or spacer is fitted. If ball joints are used, as on the Marina Mk II and i Falcon, then one ball stud will pass through the eye in the anti-roll bar and another horizontally through a bracket on the
suspension arm. With this design a hexagon is formed on the ball stud and it is necessary to note the position of the studs before loosening the nuts, so that you replace them in the correct position.
After removing the nuts between the drop link and the
suspension arm it should be possible to withdraw the bar complete with the , drop links. But in some cases you may need to remove the drop links from the bar in order to remove the bushes. Some drop links have horizontal, disc-shaped rubber bushes and metal saucers at each end, passing through horizontally-positioned eyes in the anti-roll bar and through a hole in a horizontal bracket on the lower
suspension arm. With this type there are normally nuts both above and below each pair of rubber bushes and metal saucers. Remove the outer nut at each end of the drop against the bush. The drop link will be unable to move because it will butt against the larger packing piece. Once the bush is clear of the drop link, the vice pressure can be released and the process can be reversed to fit the new bush into the link.
Fit a new metal saucer and a new rubber disc to the threaded end of the drop link and make sure that you fit the spacer. The link can now be re-fitted by reversing the removal process. You may have to raise the
suspension to obtain enough thread to fit the upper bush and lock nut. Do not fully tighten the nuts at this point. The final step is to re-fit the clamps again leaving the nuts only partly tightened. Where the anti-roll bar is incorporated into the front
suspension, the job is more complicated as the complete assembly must be removed. Once the clamps securing the anti-roll bar to the chassis or sub-frame of the car have been removed the next stage is to remove the bar from the
suspension arm. At the end of the bar there will be a split pin or a spring pin. Once the spring/split pin has been removed the nuts on the end of the anti-roll bar have to be removed.
Next, ease out the bush fitted into the
suspension arm. If a one-piece bush is fitted you may have to wait until you have withdrawn the anti-roll bar before you can prise out the bush. If a two-piece bush is fitted you can prise out the outer half at this stage. Make sure that you do not lose the shaped washer fitted between the nut and the bush. There may also be a plain washer. Make a careful note of the order in which the components are removed so that you can re-assemble them correctly. With this type of anti-roll bar you may have to lower the car or else raise the front
suspension while the car is jacked up so that the anti-roll bar is approximately horizontal to where it passes through the
suspension arms. This eases the angle at which the bar passes through the arms and lessens the amount of force required to pull the bar out. Make sure the car is secure before doing this.
At this point, if the rubber bushes that hold the bar to the chassis or sub-frame are of the split type it will be possible to simply pull them off; if there is no split they can be cut with a knife and then pulled off. Discard the bushes at the end of the bar and then thoroughly clean the bar. If the new bushes are not of the split type, smear the ends of the bar with brake fluid or rubber grease and slide the bushes along the bar until they are in line with the mounting points for the clamps. If one-piece rubbers are fitted to the lower
suspension arms on your car, fit the new rubbers in place. If each arm uses two cone-shaped rubbers, one either side of the arm, you will probably find that they will not stay in place in the arm if you simply push them in. If this is the case, fit a washer and one half of a bush to the each end of the anti-roll bar and then offer it up to the car.
Fit one end through the
suspension arm, leaving it loose at this stage, and then lever the other end into position. When the bar is pushed fully home fit the other halves of the bushes, the relevant washers and replace the securing nuts. Do not fully tighten the nuts. Replace the two clamps and partly tighten the bolts. Once the anti-roll bar is back in its correct position, with the new rubbers fitted, you can re-fit the wheels and lower the car and tighten the securing nuts and bolts to the correct torque figures. If this is done before the car is lowered, distortion can occur in the rubbers and shorten their life.
Servicing Rear Suspension Anti-Roll Bar Rubbers
With rear anti-roll bars the procedure is generally similar to that at the front unless there are no clamps holding the bar to the body. On cars fitted with this design, such as the Renault 16, to remove the anti-roll bar you need only disconnect the clamps holding the bar to the
suspension arms. On the Morris Marina II and Ford Capri II and III models the anti-roll bar is held in rubber bushes attached to the axle, the levers extending forwards to rubber bushes attached to the body. In both cases, the bushes at the end of the bar are incorporated in rod ends that are screwed on to the ends of the anti-roll bar. These may be disconnected from the body without the brackets on the axle being disturbed. Long bolts secure them to the body and these must be removed in order that the roll bar can be turned downwards allowing removal of the rod ends which are retained by lock nuts. Make sure that you fit the new bushes in exactly the same position as the old ones.
On the Ford Capri II and III models the slots in the bushes should be at the 3 o'clock and 9 o'clock position once the bushes have been pressed into the rod end pieces. If the rubbers on the axle need replacing, this is also simple, except that on the Marina the steel clamp is held in place by tags that must first be bent backwards. Again, do not tighten the nuts and bolts until the weight of the car is on the
suspension. Although the rear anti-roll bars may look rather different from those at the front, it can be appreciated that the job of renewing the rubber bushes is basically similar to that at the front and is well within the capabilities of the DIY mechanic. Providing that care and commonsense are used replacing the affected parts should not present major difficulties.