Drum Brakes
Chances are, if your old Classic Car is fitted with drum brakes to the back wheels, or even all four, you have done maintenance yourself. And if you haven't, then you should, because it is a relatively easy procedure to undertake. You will need a few items to get you started, the biggest expense being a wheel puller. Before you start reefing off wheels, take our warning that unless you're prepared to do the job properly, adhering rigidly to maker's specifications and being ready to call in a qualified mechanic if you get into trouble, you'd better leave the brakes alone. They are vital to your safety and must not be trifled with. With that warning under your belt you can breathe easier when we say that the brakes are simple and that you can hardly go wrong if you follow this advice carefully.
Try Adjusting First
First see if you can't bring the brakes up to scratch by adjusting them, which should take about 10 minutes per drum. The idea is to bring the lining on the shoes almost into contact with the brake-drum, so that when the pedal is pressed the shoes immediately touch the drum. Each pair of shoes must have the same adjustment as all other sets, otherwise braking will be uneven and a drop in efficiency will be noticed.
Adjusting is done with a screwdriver, inserted through a hole in the back of the brake backing plate. Just inside this hole there are two, near the top of each plate lies the notched wheel-cylinder adjuster. By turning this clockwise (looking at the end of the cylinder) the shoes are moved out towards the drum. Turn the adjuster out until the shoe just binds as the drum is revolved, then back off four notches. Repeat this operation on each adjuster on each wheel, being careful to get the same adjustment each time. You might find, when adjusting the rear wheels, that the shoes are binding. This is probably due to the handbrake, which should be slackened off while the footbrake is adjusted, then readjusted. Also, because of friction in the drive train, the rear wheels won't spin easily like the front ones, and allowance should be made for this.
The Hand Brake
The handbrake is adjusted after the foot brakes. To do this, set the brake in the fully "off" position, then get under the car and loosen the front check-nut on the cable-adjusting bolt in the centre of the front body cross-member. Pull on the cable equaliser until a positive stop is felt, then hold it in this position and re-tighten both check* nuts. Make sure that the wheels will still turn. When you have finished with the adjustments, you should give the car a road-test, giving the brakes gentle pressures at first, then trying a few quick stops. Find a piece of deserted road and try a fast stop. If the car pulls to one side, it's most likely due to incorrect adjustment of the brakes; but other possible causes you can check are uneven tyre treads, wrong tyre pressures, faulty shock-absorbers, wheel misalignment, faulty wheel bearings, or a crimped hydraulic line to one wheel,
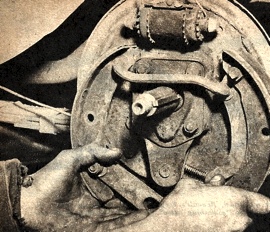
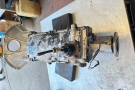
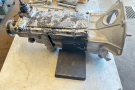
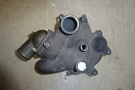
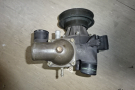
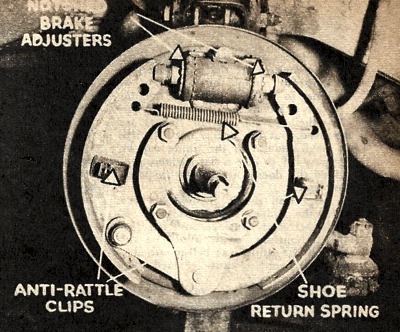 The front drum brake assembly of a 48/215 Holden.
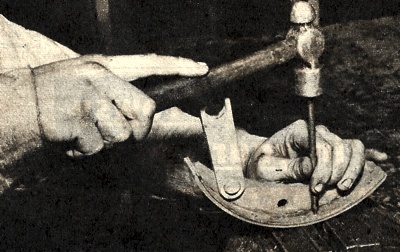
Use a pointed punch to knock out rivets so old linings can be removed. The head of the rivet must be over gap in vice jaws.
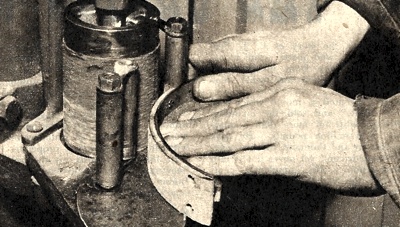
Clean the shoes thoroughly before re-lining.
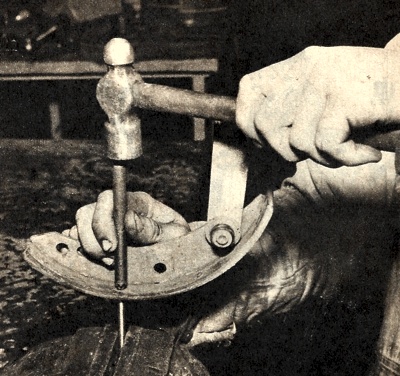
Spreader punch with star-shaped tip is the most suitable for opening out rivets to hold new linings. The flat-nosed punch under the rivet acts as dolly.
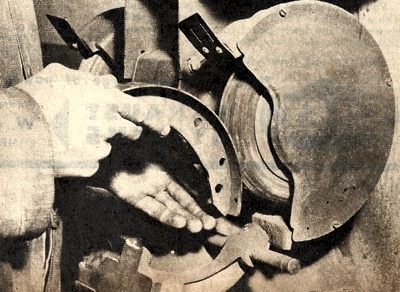
The lining surface must be even. Any bumps will have to be removed.
|
Cheeking The Linings
If you can hear the rivets scraping on a brake-drum, you will need to purchase some new linings straight away. If you're still not sure, an examination of linings and drums will soon show what's what. The front drum is easier to remove than the rear, so take it off, after removing the axle nut and bearings. Now you can see just how the linings are, and it's a fair bet that the linings on all wheels will be about the same condition. First see if the rivet heads are level with, or almost level with, the surface of the lining - that is the main test for wear. Next, closely inspect the lining for high spots, then make sure that the whole area of the lining has been in use, and not just one small section.
It could be that grooves have been formed in the lining, and these may have been transferred to the brake-drum surface. Grease, oil or hydraulic fluid soaked into the linings will render them inefficient, so check for general cleanliness of the brake parts. Back when drum brakes were the norm, manufacturers said that you shouldn't attempt to remove oil or grease by boiling in caustic soda (a popular remedy), but fit new linings. Even today, it is wise to follow their advice. If the linings are grooved, but the drums not affected, a small amount of the lining can be ground off to give a flat surface, provided this doesn't reduce the thickness too much.
Inspection should include a check that the linings are wearing evenly right across the surface, and not just on the outside, This would be the case if the drum was bell-mouthed - a fairly common cause of inefficient brakes. Drum defects can usually be corrected. Scoring, pitting, grooving, and mild cases of "bell-mouth" can all be cured by refacing the drum. This is done by turning the drum on a lathe-like machine, and cutting a new surface on the inside with a special tool. But a cut of .030in. is all that can be taken off a Holden drum; if this isn't enough, it must be replaced. This job of reconditioning the drums can't be undertaken in your backyard, but garages with the necessary equipment will do it for a reasonable charge.
Relining Procedure
Relining the shoes is a simple operation. Garages specialising in brake repairs use a foot-operated punching machine, but you can manage with a hammer, a vice, and some suitable punches. The linings are bought complete with rivets. To remove the shoes from the backing plate, jack up the car, remove the hubs (a puller is needed for the rear hubs), then secure each wheel brake cylinder with a length of wire tied around the ends, so that if the pedal is accidentally depressed while the shoes are off, no fluid will be lost. Next unhook the springs holding the shoes together, and the anti-rattle clips; these come off simply by turning the spring retainer half a turn, when the slot lines up with the pin and allows it to be pulled off. Now lift off the shoes. With the rear wheel assembly, the handbrake cable can be unhooked as the shoes are lowered.
Be careful to keep the shoes in sets, and mark them to ensure that each will go back on its own wheel. Punch out the rivets holding on the old linings, then clean the shoe thoroughly before fitting the new lining. All dirt, old lining, and burrs from the rivet holes must be removed. A stiff wire brush and a steady rub with some sandpaper will clean the shoe up nicely. Then fit the new linings, placing the first rivet in the centre, and working outwards.
Be careful not to damage the lining. Keep it clean, and get the rivets tight and firm without pinching up the lining or causing it to bulge away from the shoe between the rivets. Watch that the rivet heads are snugly down in the countersunk holes in the lining and that the split part of the rivet begins where it emerges from the rear of the shoe. However, unless you have the wrong rivets, you shouldn't have to worry about this. With the linings in place, inspect them for any unevenness, which should be rubbed off so that the maximum possible surface of lining will come in contact with the drum when the brakes are applied.
However, don't take too much lining off. Remember that the best condition of the lining is a glazed surface, and the quicker this can be reached the better. So when you get the car going again, use the brakes gently for a few days to run them in. When reassembling the shoes, smear zinc oxide grease on the shoe thrust pads and all moving metal parts, but don't get it near the linings. Make sure the shoes are in contact with the backing plate (the anti-rattle device should draw them firmly against the flange of the plate). On the handbrake lever in the rear assembly there is an eccentric pivot with a chamfer; see that this faces upwards when the rear shoes are fitted. After assembly, the brakes should be bled and adjusted.
Bleeding, Adjusting
With hydraulic brakes you will find a bleeder tube is attached, with a valve, to a special fitting at the rear of the wheel cylinder; the valve is opened by turning the nut about half a turn, and the end of the tube held in a glass jar containing brake fluid. Then have a helper slowly depress and release the brake pedal until no more air bubbles come out of the tube. Tighten the valve cock, and move the tube to the next wheel. Wheels farthest from the master cylinder should be treated first; so do the left rear, left front, right rear, then right front wheel in that order. Remember to fill the master cylinder before and after bleeding, and use only a recommended fluid. Absolute cleanliness is essential in this operation.
Adjusting the footbrake after a reline is done the same way as after a minor shoe adjustment, but a handy tip for the rear wheels is to fit the rear assembly and hub, then apply the brakes hard, with the car stationary, to position all the parts. Then dismantle, tighten parts, reassemble, adjust the footbrake, and make a full adjustment of the handbrake. To do this you will have to remove the drum again, then loosen the eccentric pivot bolt lock-nuts, and see that the chamfers (wrench flats on the bolt) are UP, Place a l/32in. shim between the shoe and the ball end of the cable in the lever. Hold the lever and turn the eccentric until any clearance is taken up. Then tighten the eccentric lock-nuts and re-check the clearance, reassemble, and road-test. A properly adjusted handbrake should skid the rear wheels when applied hard. After bleeding and adjustment, free travel of the brake pedal should not exceed Jin. (3/16in, Is ideal).
Watch Hydraulics
Regular attention to the brakes can forestall major repairs. Make sure that the master cylinder is always topped up to within 1/4in. of the top, but if it requires filling often, look for the cause, It could be a leaking rubber cup in a wheel cylinder (indicated by streaks of fluid on the inside of the tyres), a master-cylinder leak, or evaporation due to engine heat, although the latter seldom happens on early Holden's.
Try to keep a check on the brakes by noticing how quickly they can stop the car when in good order, then comparing them in a few months' time. If you notice you need more and more pedal pressure, you can bet that the linings are getting thin, that there is grease or dirt about, or that the drums need attention. We don't suggest you should attempt repairs to the master or wheel cylinders. The work is not difficult but the slightest error will affect safety - leave this job to the experts. However, as we said earlier, you can hardly go wrong with the adjustment and relining, and you can save a lot of money by doing them yourself.