Car manufacturers generally advise the DIY mechanic to have the car's
steering track or front wheel alignment checked by a garage. This is mainly because a car's wheel alignment must be set up extremely accurately and the apparatus a garage uses is expensive and difficult for the home mechanic to obtain. However, DIY tracking gauges are available from motor accessory stores and they provide an accurate reading at a fraction of the cost of the professional gauges.
How Wheel Alignment Works
As the car moves forward, the front wheels have a tendency to roll apart or try to point outwards away from the centre. This is due in part to the "camber" angle of the
tyres, the effect by which the front wheels tilt outwards at the top. The idea of cambered wheels is to make the
steering easier to turn and to transfer most of the loading on the wheel on to the inner wheel bearing in the hub which is often a larger size for this reason. The exact angle of tilt (camber angle) is important. If it is exaggerated the outer edges of the
tyres will wear excessively. If the angle is insufficient the inner edges of the
tyres will wear.
When the car is in motion the wheels are prevented from moving apart by the track rods which, in addition to imparting movement from the
steering box or rack to the wheels, effectively brace the front wheels and keep them parallel to each other. But because every
suspension and
steering system has a small amount of free play or "give", and because the tracks rods are not absolutely rigid, it is necessary on most cars to align the wheels so that they "toe-in" or point inwards slightly when the car is stationary. In other words, this counteracts the moving apart effect of the wheels and keeps them parallel to each other when the car is moving along in a straight line.
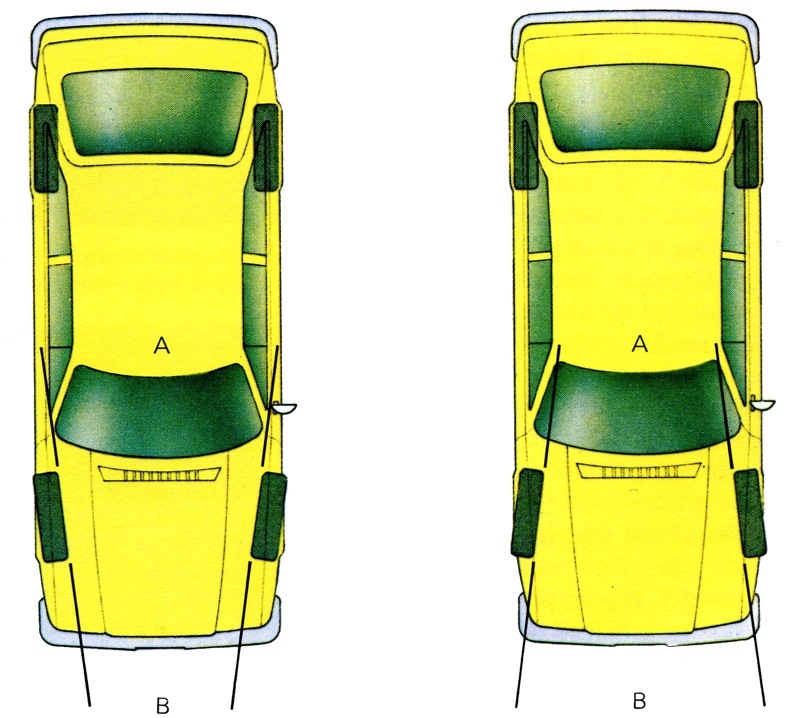
Toe In
When the car moves forward, the tendency of the wheels to splay outwards will then either compress the track rod along its length, if it is behind the pivot point of the wheels, or alternatively stretch it, if it is in front of the
steering pivot point. The amount of this compression or stretching is calculated so that the wheels will be brought back exactly in line and parallel. Although the method of operation of different tracking gauges will vary, in basic terms the calculation is reached by measuring the distance between the rims of the wheels, at the height of the stub axles, in front of and behind the axle. The difference between the two distances gives you the toe-in or toe-out reading.
Obviously the dimension concerned is quite small and the figure is usually between 1.58 mm (1/16ins) and 6.35 mm. Accuracy to within 0.79 mm (1/32ins) is important because in some cases even a slight maladjustment can result in rapid
tyre wear on either the inside edge of the treads or the outside edges, depending on which way the maladjustment is. There is also the possibility of
steering "float" or "wander". Toe-in is a requirement on the
steering of most rear-wheel drive cars, but in the case of the front-wheel drive the measurement may be reversed, so that a toe-out reading is necessary.
When To Check The Track
Sometimes the interval at which
steering alignment should be checked is mentioned in the car's maintenance schedule, but often it is not listed as a regular item at all. It is difficult to specify an interval, but the track should always be checked as soon as possible after a front end accident and especially after striking a kerb or damaging a wheel. It should also be checked immediately following any work on the front
suspension or
steering that could have disturbed the setting, before you fit new
tyres or at any time when uneven wear is detected on the
tyres which could be the result of an incorrect track setting.
Tyre Wear
The first sign that the track needs adjusting is usually heavy
tyre wear. The sort of wear to look for is a distinct band where the wear is more pronounced than the rest of the
tyre, either on the outside or on the inside of the tread. This could be on both front
tyres or on just one of them. However, this is not necessarily a conclusive indication as similar wear can result from a worn
steering joint. In Europe and Australia some cars wear the outside edge of their nearside front
tyres quite quickly even though the wheel alignment is correctly set up. This fault is due mainly to the camber of the road. Apart from checking the state of wear at regular intervals and rotating the
tyres on the car, there is little you can do about this fault.
Another typical wear symptom which can indicate track misalignment is known as "feathering". This is a "fin" effect on the edges of the tread pattern. To check for this, pass the palm of your hand over the tread from the outside edge to the inside then back again from inside to outside. If the tread feels smooth one way and all the tread edges "obstruct" the other way, this is probably feathering and the cause is likely to be incorrect front wheel alignment. The effects of this can also be detected as faults in
steering behaviour, although the same symptoms can also result from other causes - mechanical wear, incorrect geometry, or both. Steering wander is a further possibility, but this can also result from wear in the
steering box or
steering linkage, low
tyre pressure, too much weight in the back of the car, a binding linkage or insufficient angle.
The castor angle - or the
steering's self-centring effect on a car works in exactly the same way as a castor on furniture or a wheel on a tea-trolley. As the vehicle is moved, the wheels swing into line in the direction of movement. They do this because the points on which they pivot are positioned ahead of the contact point between the wheel and the ground. This trailing effect of the wheel causes the
steering wheel to return to the straight-ahead position of its own accord after the car has turned a corner. Insufficient castor angle will make the
steering unstable and the
steering will be reluctant to self-centre. If the castor angle were reversed the car would be virtually un-steerable. Castor angle which is different on one side from the other will result in
steering bias. Checking your car's castor angle is a job for a garage as it is not possible for the DIY mechanic to adjust it successfully at home.
Before You Start
If incorrect front wheel alignment is suspected, there is only one way to find out and that is to establish if the toe-in or toe-out measurement is within tolerance. Before you can do this, you must make sure that the car is in the right condition to give an accurate reading. Carry out the following checks:
- Make sure that all the tyres are set at their correct pressures for normal motoring.
- Check the wheel bearings for excess movement.
- Examine all king pins, ball joints and steering linkages for wear.
Do not forget that there is no way any equipment can correct the track where the wheels are damaged or buckled, or if any steering bushes or wheel bearings are worn, or if the tyres are already badly feathered. Finally, check with your dealer to find out the correct toe-in or toe-out measurement and the actual track adjustment procedures, for example, whether you alter the position of both track rods or just one.
Checking The Track
Although if you are careful it is possible to make your own wheel alignment gauges, it is not generally recommended because the measurement you are checking is so small that it is difficult to get an accurate reading. Two DIY tracking gauges can be bought from UK stores and in Australia, Servex in Melbourne supply a device which works like the Paddy Hopkirk device and is inexpensive.
Most wheel alignment gauges work by measuring the distances between the outside wheel rims. There are two U-section brackets which are located on the lower part of the wheel rim on the outside and held in position by expanding rubber straps. To operate the gauge, locate the extended section exactly on the wheel rim. Now, using the rule provided, measure the distance between the ends of the gauges in front of the wheels. Next carry out the same operation but this time measure the distance behind the wheels. Subtract one reading from the other and this will give you the toe-in or toe-out reading in degrees. To convert this to the more normal toe-in dimensions, in millimetres or fractions of an inch, remove the gauges from the car and set them up on the ground using the same measured dimensions to get them in the same position. Measuring between the extended sections will then give the dimensions at the front and rear of the rims and the difference will be an accurate indication of the toe-in.
Another type of DIY tracking gauge, known as "Trakrite", works on an entirely different principle and measures the actual sideways scrub of the
tyres. It is this scrub which causes
tyre wear. The device consists of a base plate with a second movable plate mounted on rollers on top. Linked to the top moving plate is a pointer which registers on a dial. As the car wheel is driven over the gauge, any sideways movement (scrub) of the
tyre will move the pointer round the gauge and so indicate the misalignment - either toe-in or toe-out. Wheel alignment varies on many cars according to the extent to which the
suspension is compressed. Since it cannot be assessed in advance what load a car will carry, manufacturers' alignment settings can only be a compromise. Because of this, the manufacturers of "Trakrite" gauges recommend that the car is tested carrying its normal load.
To start with you need a level piece of ground, preferably concrete, twice the length of the car. Drive the car backwards and forwards a few times to make sure that it is pointing straight ahead. Now line up the gauge directly in front of one of the
tyres. Look down the length of the car to be absolutely certain that the gauge is set up in line. Next reverse the car away from the gauge with hands off the
steering wheel. Then, with your hands still off the
steering wheel, drive forward at no more than 3 km h (2mph) up on to the gauge and back off again. Note the reading and repeat the sequence with the other wheel.
Adjusting The Track
If you find that the wheel alignment is not within tolerance, you must now alter the track rods until a repeat test with either gauge shows that the wheel alignment is within limits. With the tracking gauge this means that you will require an actual reading, for example 1/16ins toe-in. But with the Trakrite gauge so long as the pointer stays in the central portion when each car wheel runs over it the wheels will be in perfect alignment. The technique of adjusting the track is not complicated. Disconnect the battery, jack the car up and place it on stands to give you access to the track rods. Alternatively you may be able to reach them by leaving the car on the ground and turning the
steering on to full lock. Next, slacken off the lock nuts at both track rod ends. With cars that have rack and pinion
steering you may now find it necessary to loosen the gaiter securing clips so that the lock nut can be exposed and the track rod turned without twisting the gaiter. Adjustments are made equally on both sides, a quarter of a turn at a time, until the toe-in or toe-out is adjusted correctly.
There are variations to this. Some cars, like the Renault 12, must have the joint between the track rod and
steering arm parted so that the joint itself can be rotated to achieve the adjustment. Slacken the locking nuts and rotate the joints inwards to increase the toe-in (or decrease the toe-out), or outwards to decrease the toe-in (or increase the toe-out). Remember to re-tighten the lock nuts when the adjustment is complete. One some cars, like the Peugeot 504, the adjustment is carried out on one track rod only. This also applies to the VW Golf, which has adjustable track rods on both sides. Other variations include the Rover 3500 series which has a single centre adjustment. When you have made the adjustment you think is correct, tighten the lock nuts, then bounce the front of the car up and down several times and push the car back and forth once or twice. Then re-check the track. This allows the
suspension to settle down and to adopt its normal running position. If you do not do this you will get misleading results from the alignment gauges.
Sometimes a track rod or its sleeve will become rusted up, seize and consequently not turn. If this happens first soak the entire assembly with a rust-penetrating fluid and leave it for a short while. Then use a self-locking wrench to lever the track rod back and forth until it frees. Eventually it should be possible to move the track rod, but if you cannot do so you will have to renew the complete assembly. Remember that even a slight misalignment of the tracking can reduce the life of a
tyre by as much as 16,000 km (10,000 miles). If your wheels are radically out of alignment and they are not correctly re-aligned even more rapid tyre wear will soon occur. As the wheels of a car must be parallel when following a straight path, any serious misalignment will also set up a semi-skid situation which could alter the
steering characteristics and the safety aspect of the car.