The MacPherson strut and the double wishbone front
suspension systems are the most common arrangements in post-war cars, but there were a number of other systems used. A differing coil spring system was fitted to Rover 2000 and 3500 models. A special rubber spring system was used on Minis and a double wishbone, transverse leaf, spring system will be encountered on several older cars. Failure of the springs in any of these systems results in the car sitting low at the front.
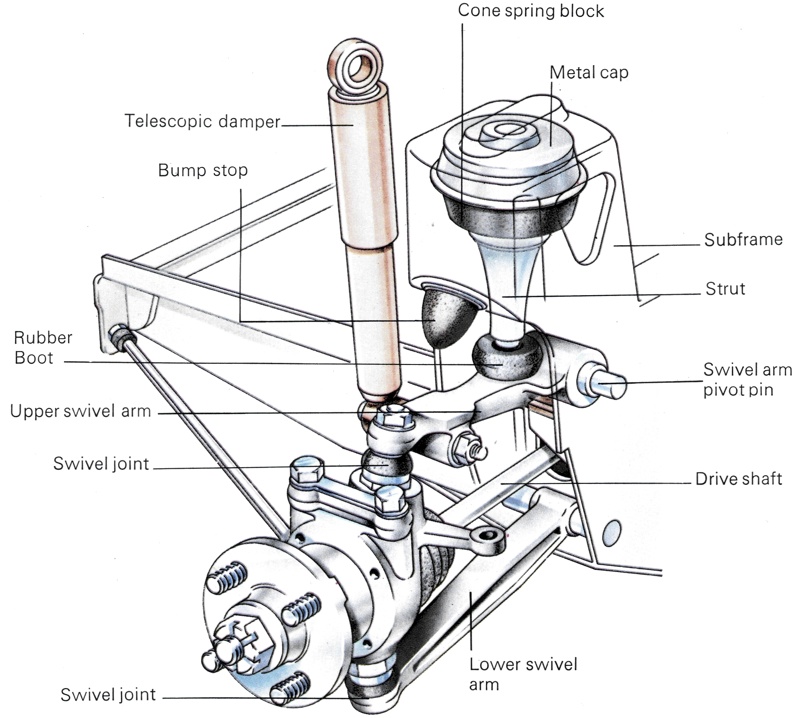
Rover 2000 and 3500 Front Suspension
Rover 2000 and 3500 cars use a coil spring front
suspension system with an unusual layout. The coil springs sit in a horizontal position to the rear of the front wheel arches. Each wheel has one coil spring and one telescopic damper. A vertical strut, called the swivel pillar, is connected at its bottom end to the stub axle assembly. The bottom link and bottom link strut are also connected to the bottom of the swivel pillar, by means of a ball joint. These bottom link and link struts are then connected at their other ends to the car's underbody opposite the wheel hub assembly. The top of the swivel pillar is connected via a ball joint to a
suspension arm. The arm pivots on a long, transverse bearing, each end of which is connected to the bulkhead. The
suspension arm itself consists of a rod with a central "Y"-shaped projection. The swivel pillar is connected to one of the branches of the "Y"-shape and the coil spring is connected to the other branch. The other end of the coil spring is firmly attached to the bulkhead.
Removing Faulty Coil Springs
Before starting to remove the coil spring, there are three preparations to make. You will need three, special, spring-retaining rods, which you can hire or perhaps borrow. Next, arrange for three or four heavy friends to help with the first stage of the work - compressing the springs. Finally, clean the
suspension components with a stiff brush to remove any thick road dirt. It is generally easier to carry out the work after removing the front wings. To do this, first disconnect the battery earth terminal, then label the three cables fitted behind the wing and free them from the wing. Next, take off the bolt and washers holding the top of the wing to the frame. This bolt also holds the hinge. Remove all the securing bolts, noting down their positions for later re-assembly.
Protect the wing with masking tape to prevent scratching it on the front bumper, then gently ease the wing forward and free it from the retaining dowels at the front and back. If the rear dowel sticks, ease it with penetrating oil where the dowel enters the rear rubber grommet. The wing will still be connected to the car by the lighting wires. Disconnect them, noting their positions for re-assembly. The wing can then be stored safely away from the car and you can start removing the
suspension springs themselves using the following technique. Have your heavy friends sit on the front of the car and insert the three spring retaining rods when the springs have been compressed as much as possible. Turn the retainers through exactly 90� to prevent the spring expanding again, then rotate the spring once to make sure that the retainers have been correctly seated. Jack up the car, support it on stands and remove the wheels after disconnecting the battery.
You will now have to remove the
suspension arm from the top of the swivel pillar. The two parts are held together by a ball joint, and a ball joint splitter will be needed to carry this out. Remove the split pin and then undo the castellated nut at the top of the swivel pillar. The
suspension arm can then be prised off with the ball joint splitter. It is possible to remove the spring without taking off the
anti-roll bar, but this makes the work harder and any time saved by leaving the bar in is lost by trying to work round it. To remove the
anti-roll bar, first take off the bolts and lock-plates that hold it to the top link. Then lever the bar out and put it to one side.
You will next have to compress the spring with the spring compressors. Now remove the top link assembly stiffener and the three spring retainer rods used earlier. Press the top link down towards the swivel pillars and you will be able to lift out the spring. When fitting a new spring, you will have to remove the spring compressors from the old spring to re-use them. Take great care in doing this because the spring is under great tension. Fit the new springs by reversing the removal method.
Double Wishbone With Leaf Springs
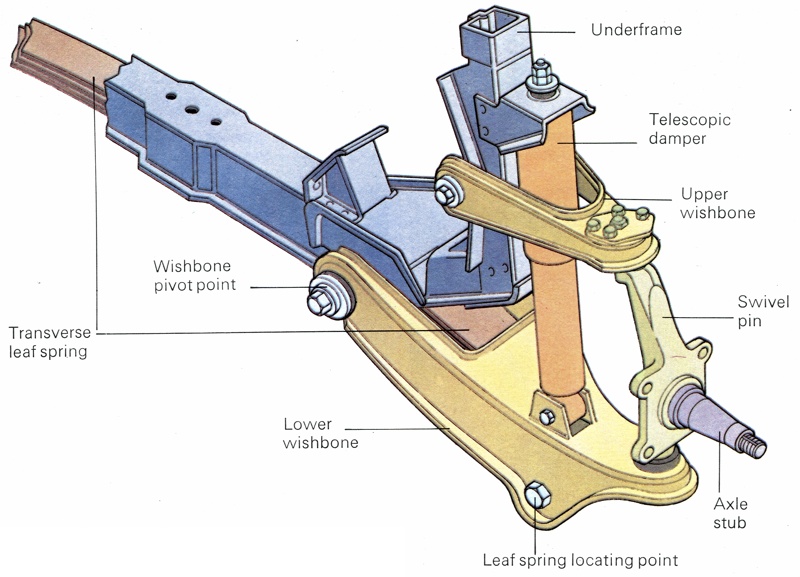
A front
suspension system used on a few cars consists of the double wishbone arrangement, but using transverse leaf springs in place of the coil springs. Sush an arrangement is fitted to the
Vauxhall Viva (GM) HA series. There are two wishbones - a shorter upper wishbone and a longer lower wishbone. The upper wishbone is mounted on a fulcrum shaft connected to the support post (part of the cross-member assembly). The lower arm is directly mounted on the cross-member The spring consists of three spring steel blades with rubber inserts between each blade. Each end of the spring assembly is connected by elongated spring eyes to the outer ends of the lower wishbones. These are held in place by rubber bushes and pins. The spring must be free to flex along its length, therefore the three leaves are clipped together but not bolted through. The rest of the assembly is set up like the coil spring, double wishbone system see.
Removing Faulty Double Wishbone Leaf Springs
The leaf springs used in the double wishbone, front
suspension system are constantly in a state of extreme tension. Removing and replacing them are therefore difficult jobs and you will need special tools which you should hire before starting this particular job. First, disconnect the battery, slacken the wheel nuts and jack up the car to at least lm (3ft). Put the car on axle stands to maintain this height, then remove the wheels.
You will now need a leaf spring spreader. This does not have to be the specific tool for your car; any tool that has sufficient length to fit the spring eyes will do and you should be able to borrow or hire one from a good garage. Insert one end of the tool in each set of spring eyes and spread the spring far enough to take the load off the dampers. Remove the mounting pin which secures the lower end of the damper. Next, separate the lower wishbone from the steering knuckle. To do this first remove the nut and sealing boot from the ball joint where the lower wishbone meets the swivel pin.
Next, remove the tapered ball joint pin. This requires the use of another special tool, a claw clamp. Fit the clamp on the tapered pin, then strike the end of the long handle on the tool downwards to release the pin. Next, loosen the bolts that hold the "Y" projections of the lower wishbone to the cross-member, but do not remove them. There is a safety strap under this wishbone. Release it and remove the nuts and bolts securing the fulcrum shaft to the cross-member. Carefully release the spring tensioner and lift up the lower wishbone where it is still connected to the spring by a nut and bolt. Undo this nut and bolt and lift out the lower wishbone placing it carefully to one side. Repeat the procedure for the other side of the car to free the spring completely. You can now lift the spring out of the car and prepare to fit a new spring.
Fitting A New Spring
Fitting a new transverse leaf spring is basically the reverse of removal but remember the following point in order to make the job easier and quicker. When fitting the rubber bushes into the spring eyes, fit them so that the flats in the bushes will be vertical when the spring is fully fitted. The bushes may be easier to fit in the elongated eyes of the spring if you first soak them in soapy water. Do not try to use oil; this will damage them. The buffer fitted to the centre of the spring should be in good condition. Take care to locate it correctly in che cross-member otherwise it will not function.
Make sure that the spring seats are correctly located before bolting the fulcrum shaft to the cross-member. Finally, lower the car on to its wheels so that its full weight is on the springs before you fully tighten the fulcrum shaft pin and bolts and the spring eye bolts to the correct torque settings which you will find in your manual.
Mini Cone And Strut System
Early versions of the Leyland Mini incorporated a rubber cone and strut
suspension system which is exclusive to this car. In 1964 the system was replaced by the
Hydrolastic suspension system but the
Hydrolastic system proved unsatisfactory on such a small car and in 1971 the rubber cone and strut system was re-introduced. At the front of the car, conventional upper and lower
suspension arms exert an upward force on a cone-shaped strut above them - this in turn compresses a hollow rubber spring which is mounted on the front sub-frame. The system still uses conventional dampers.
Replacing Faulty Rubber Cones
To remove the highly individual Mini cone and strut front
suspension system, you will need special spring compressors. Hire, borrow or buy these before starting work. First, open the lock tabs and slacken the two bolts that hold the front sub-frame tower to the engine bulkhead cross-member. Withdraw these bolts, remove the cover-plate. This exposes the access hole for the spring compressor tool. You can now compress the spring. First insert the special tool through the access hole in the cross-member so that it engages on the edge of the hole. Make sure that the spindle on the tool is placed with the end in the centre screw before you turn it. Next, turn the centre screw about nine turns into the spring unit. Then operate the ratchet handle to screw the centre spindle nut down on to the body of the tool. Holding the centre nut firmly, turn the ratchet clockwise until the spring is compressed sufficiently to allow the strut to be removed from the tower.
Disconnect the battery before going any further. Slacken the wheel nuts, then jack up the car at the front and remove the wheels and bump rubbers. Undo the upper swivel arm retaining nut which holds the arm to the ball pin. You should then split the joint. This may be difficult and require the use of another special tool, which you should be able to hire from a good shop. When you have split the joint, you can lever out the spring strut. Finally, disconnect the swivel arm and decompress the springs.
The spring is now ready to be removed. First unbolt the damper eye and extract the upper swivel arm pivot, complete with the nut on each end, the thrust collars, retaining plate, thrust washers and sealing rings. Next, turn the ratchet on the spring compressing tool anti-clockwise to release the spring pressure. Slacken the centre screw nut and remove the rubber cone spring. A new spring is fitted by reversing the above method.
Non-Spring Suspension Systems
The front wheel
suspension systems described so far are all mechanical systems using either a conventional metal spring or the more unusual rubber spring. There is one more mechanical system still to be described�the torsion bar system. This system uses a metal bar which is twisted when the wheel moves either up or down. The resistance of the metal bar to the twisting action works in the same way as a metal spring. The next article in this series describes this system and also the variety of non-mechanical systems which use either fluid or gas as the spring medium.
Also see: Suspension Repair Part 1 |
Steering and Suspension Repair