The Tapered Roller And The Ball
Wheel bearings perform an important function in the smooth running of your car, but they are frequently overlooked when routine checks are made. Adjustment is critical. Loose bearings wear rapidly and may cause erratic tyre wear. Bearings that are too tight can heat up and seize and there is a chance that the car may lose a wheel - with possibly dire consequences. Conversely, correctly adjusted, free-running, bearings can aid fuel economy, as they offer minimal resistance to the rotation of the wheels.
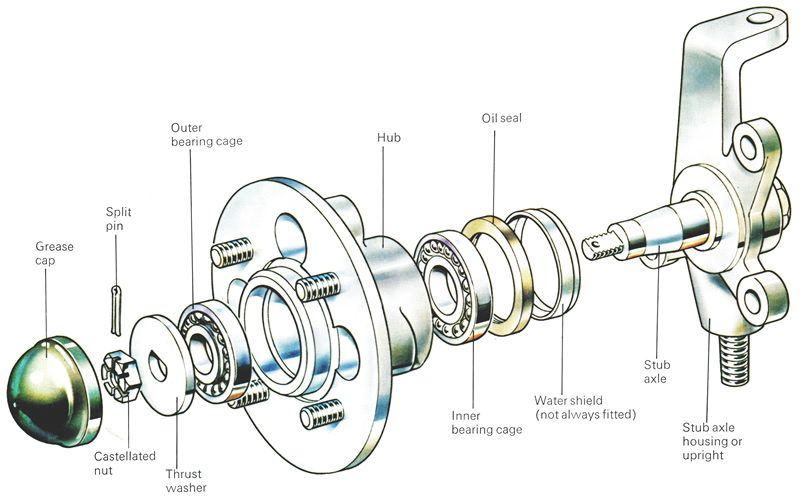
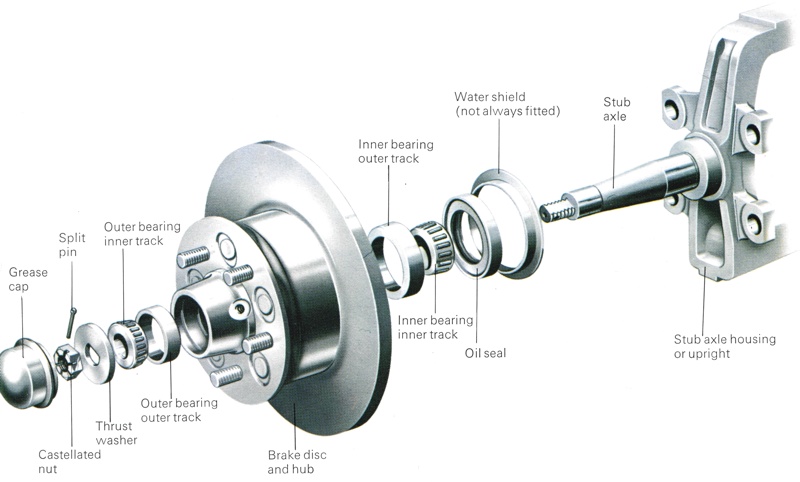
There are two types of wheel bearing, the tapered roller and the ball. Most bearings consist of an inner and an outer track, with the ball or roller bearings held in a cage to keep them evenly spaced. The outer track of each bearing is an interference fit with the hub, the inner track holding the bearing itself. To complicate matters, the bearing fitted nearer to the stub axle housing is referred to as the inner bearing; that nearer to the hub securing nut is known as the outer bearing.
The track on a ball bearing - sometimes known as a ball race -will normally have a raised internal lip on one side (commonly known as the thrust side) while roller bearings normally have a tapered shape which serves the same function. This is to provide the necessary side location of the wheel, which must be as friction-free as possible. That is why the correct side clearance of a wheel bearing is so important. Insufficient clearance will cause friction and consequent heat build-up, which can rapidly destroy bearings. Too much clearance can accelerate wear through incorrect contact of the bearing faces.
Most tapered roller bearings are adjustable. Non-adjustable bearings of this type are rare. The majority of ball bearings are non-adjustable. Wheel bearings are made of steel and require a lubricant. The most convenient is high-melting point grease, normally retained in the hub by a seal. This bears against a shoulder, within the hub, often referred to as the seal land. On cars fitted with disc wheels of the bolt-on type, the hub has a small grease cap covering the securing nut. Before you begin even to check your wheel bearings, you must find out which type your car has by consulting either your handbook or your local dealer. It is vitally important that you tighten the hubs to the manufacturer's specified torque figures. Accidents have occurred where adjustable bearings have seized after being tightened to a torque figure far in excess of the load the unit was designed to take.

Where the hub is held in position by two nuts, hold the inner steady with one spanner, and slacken the locknut with another. |
Checking Wheel Bearings
Wheel bearings must be checked for wear and faults at the regular service intervals, as stated in the vehicle handbook. Some service schedules recommend washing out the bearings after high mileages and repacking them with fresh grease. This has become increasingly unnecessary due to modern lubricants having a far longer life. Three checks should be carried out. For all of them the car will have to be raised and supported firmly on axle stands, after disconnecting the battery.
The first check should be made on the bearing adjustment. The best method is to hold the wheel lightly at the top and bottom of the tyre and attempt to rock it in the vertical plane. The ideal state of adjustment for adjustable bearings is barely perceptible play. If non-adjustable bearings are fitted (these have no adjustment details in the manual, only a torque figure) they should normally have very little or no play (or end-float).
The maximum permissible end-float on non-adjustable bearings is in the region of 0.15 millimeters. This can generally be measured by inserting a feeler gauge between the inner track of the outer bearing and the thrust washer. The thickness of feeler gauge blade required to take up the end-float gives a guide to the amount of wear present. It is not always possible to use this method, however, as the lip of the hub may partly shield the securing nut, preventing the insertion of the feeler gauge blade.
Adjustable bearings can usually be checked in the same manner. A problem will arise if your car has wire wheels, for the splined hubs often mean that the outer bearing and the thrust washer are buried well within the hub. This can also occur on disc wheels for the same reasons as outlined for non-adjustable bearings. In these cases, the only answer is to use the wheel rocking test.
The second test involves giving the wheel a good spin by hand and listening for any roughness in the bearings as the wheel rotates freely. To carry out this test, you may have to slacken off any adjusters on drum brakes or retract the pads slightly on disc brakes. Rubbing brakes may cause too much wheel drag and any noise from this source may mask bearing noises. Disc pads can be gently levered back from the disc or removed altogether. The removal process is outlined on pages 254 to 260. Faulty bearings make a "shushing" sound and badly worn bearings may "rumble" or "click" as the wheel spins. A small amount of noise may simply be due to lack of grease.
The third check is to study the condition of the grease, even if there is no excessive end-float or noise in the bearings. Remove the wheel, then prise the small grease cap from the centre of the hub. This is usually made from thin steel and is a push fit or it may sometimes be threaded. In rare cases the caps on the left hand side of the car may have left-handed threads which must be turned clockwise to remove. (This may also be the case with the central bearing nut where the caps have a left-hand thread.) The push fit types are either plain or have a raised lip round the edge. The latter type is simply levered out with a screwdriver, moving round the edge. The plain variety can often be levered out with care, but may have to be gripped lightly with a pair of pliers and slowly worked out. Take care not to distort the cap. A few light taps with a soft-faced hammer usually shifts stubborn caps.
If the car has wire wheels on centre-lock hubs, you may have to wait until you have removed the hub to gauge the condition of the grease. If the grease around the outer bearing has a brownish tinge and a waxy quality, it has dried out. It may even have an unpleasant smell. This is also a sign that it has oxidized and although probably still serviceable it should be renewed. If the grease has taken on a whitish appearance or contains any white spots, it is probable that it has become contaminated with water. Again, the remedy is to carefully clean out the old grease and lubricate the hub with a fresh supply.
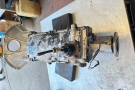
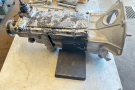
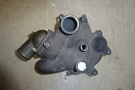
Removing The Hub
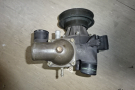
To clean and repack the hub with fresh grease or to renew the bearings, you will have to remove the hub. This is a fairly simple job on non-driven hubs. Driven hubs are dealt with in a later article. Where the car is fitted with drum brakes, remove the drum. Some older vehicles, such as Ford's Anglia 105E model, have a one-piece drum and hub which makes the job easier. If the car is fitted with disc brakes, the calliper will have to be removed. There will be a locking device on the central bearing retaining nut. This could be a locking tab, which must be renewed when disturbed, a locking nut or, more commonly, a castellated nut or pressed-steel castellated cover, retained by a split-pin. A new split-pin should be fitted each time the nut is disturbed as the pin becomes fatigued if the ends are bent over too many times.
To remove locking nuts, you will need to use two spanners of similar size in order to hold the inner nut as the outer is loosened. Split-pin removal is just a matter of squeezing the tails of the pin into line and pulling it out. Remove the hub nut and thrust washer. If the hub is fitted with adjustable bearings, the outer bearing should be supported as the hub is pulled off the stub axle, otherwise it could drop out. The inner track on the inner bearing of adjustable bearings will sometimes be a tight fit on the stub axle and some force may be needed to remove the hub as the bearing is held by the grease seal. Removing the hub may leave the inner race and the seal on the axle.
It is often extremely difficult to remove this part of the bearing without damaging both the bearing and the seal. Normal practice for removing the bearing is to tap a thin chisel carefully between the face of the upright and the axle, and the edge of the bearing track. Work round the edge, being careful to hold the chisel at an angle where it does not mark the axle. When you have a gap large enough to take a screwdriver blade, use two screwdrivers at opposite sides as levers to remove the bearing. In extreme cases a bearing extractor will have to be obtained. You can either borrow or hire one.
Hubs with non-adjustable bearings are often a tight fit on the axle and may need a suitable hub puller. A method of removing hubs which prove difficult to pull off is to fit the road wheel loosely with the outer side facing the hub and two or three wheel nuts in position. The wheel can be carefully jerked outwards to act as an impact hammer. It may be more convenient to remove the disc on disc-brake hubs before working on the bearings. Lightly scribe marks near one of the retaining bolts on the disc and near the respective bolt hole on the mounting flange on the hub, to ensure that the disc is returned to the same position. This helps to maintain the balance of the unit.
Splined hubs, as fitted to centre-lock wire wheels, require a slightly different removal technique. As the securing nut and split-pin are hidden by the splined section of the hub, access holes are pre-drilled by the manufacturers. Working end on to the hub, bend back the legs of the split-pin, then work it out from the stub axle through one of the access holes (fig. 9). The nut can then be loosened with a socket and extension and the hub removed.
Removing Non-Adjustable Bearings
Be careful not to damage non-adjustable bearings if they are only being removed for cleaning and de greasing. Unfortunately, this is not always an easy task. Non-adjustable bearings will have a distance piece between the two inner tracks which carry the bearings, the two being held together by the two outer tracks. Some hubs have sufficient room inside to enable you to push the distance piece, which also acts as a thrust washer, to one side. This is possible because it is no longer held in place by the stub axle, the hub having been removed. This type of hub is, however, fairly rare. When you drift out the bearings, you should never allow the drift to act on the inner tracks, as this may deform them with consequent damage to the bearings when the hub is refitted. If you do not have enough room in the hub to push the distance piece to one side, it is almost certain that you will have to destroy the bearings to remove them, by drifting them out against the inner races.
Warming the hub by immersing it in hot water sometimes allows the bearing to be removed more easily. Never apply flame to heat the hub. If a non-adjustable bearing comes apart, renew both bearings. Once the outer bearing has been removed, the inner bearing can be drifted out bringing the seal out with it. Many hubs have internal longitudinal slots opposing each other to allow the outer track of either the inner or outer bearings to be engaged with a thin drift. Tap each side evenly to remove the bearing.
Removing Adjustable Bearings
Adjustable bearings are usually much simpler to remove. If the seal is damaged or worn, it can simply be prised out and the inner bearing inner track pulled out to allow you to drift the outer bearing outer track from the hub. If the seal is worth using again and the bearings only need repacking, drift out the inner bearing outer track to clean the hub.
Cleaning and Checking The Bearings
Petrol is the best cleaning fluid for removing dirt and grease, but should be used with caution owing to its inflammable nature. Wash the bearings separately from the hub if they are to be used again, in order to avoid unnecessarily subjecting them to dirt from the hub body; one tiny piece of grit can wreck a bearing or seriously limit its life. Wash the bearings in a clean tray of petrol using a clean paint brush. Never spin a dry bearing excessively fast, especially if blowing it out with an air line. Once all the parts are spotlessly clean, they should be inspected for wear and damage regardless of whether any noises were present during the check, as faults can sometimes be spotted which have not shown up in the form of noise.
Check the internal surfaces in the hub into which the bearing tracks fit. A polished appearance, sometimes accompanied by light scoring round the bore, will mean that the bearing has been rotating in the hub. Check also for the same faults on the stub axle. Do not regard the bright ring on the upright at the base of the axle as a sign of bearing wear�it is normal wear caused by the seal lip. If there is no sign of a ridge at the edge of the polished area, this means that serious wear has not occurred. Apply some bearing fit compound to any slightly worn areas before re-assembly.
Check the working surfaces of the bearing tracks and the balls or rollers, for any marks or pitting. Lubricate the bearings with a few drops of light oil and hold the inner track while running the outer track under pressure across the palm of your hand to feel for any "clicking" or roughness. If anything of this nature is found, the bearing should be renewed. Always replace bearings as a set complete with the grease seal. Bearing sets for most popular cars are obtainable from accessory shops and most motor factors. In all cases, the "high side" of a taper-roller outer track, or the lipped side of a ball race, should face inwards to the hub. Some races will be marked "thrust" on the edge of the track and it is this side which must face inwards.
Replacing Non-Adjustable Bearings
Thoroughly pack the one-piece, non-adjustable type bearings with grease. A good method is to place a blob of grease in the palm of your hand and scoop and press it in whilst rotating the bearing. Keep pressing in the grease until it has oozed through all the way round. When packing hubs with grease, it is normal practice to leave a substantial air passage through the hub body. If this is not done and the hub is filled completely with grease, a hydraulic action takes place when the wheel is in motion at speed and the grease can be pumped out, to the detriment of the seal and the bearings.
Place the hub upright in a vice and place the outer bearing level in the top of the hub. You can use an old outer track as a drift to tap the bearing down carefully and evenly into the bore. Make sure the bearing is properly bedded in against the shoulder. It will suddenly change note as you tap it down and make contact. Place a generous blob of grease inside the hub and push in the distance piece. Always fit the distance piece, if supplied, with the new bearing kit. The distance piece may be tapered towards the front. Some are thin, crushable types and these should always be renewed to avoid the possibility of replacing a damaged part.
Smear the seal with grease on the lip and the outer edge. Place the seal squarely in the hub bore and tap it down evenly. A good method is to use a small square of clean hardwood covering the seal to avoid damage or, alternatively, a large socket or an old outer track which fits against the edge of the seal. It should be tapped in gently to avoid damage and to ensure that the seal fits flush and square in the bore.
Replacing Adjustable Bearings
Follow the same procedure for adjustable bearings. These are normally of two-piece construction, so the hub and the bearings can be packed with grease after the outer tracks have been fitted. Never mix the inner and outer parts of the bearings as they are factory-matched. Before refitting the hub to the axle, especially if a new seal has been fitted, clean any rust from the upright at the base with some 400 grade wet and dry paper. But do not rub along the line of the axle. Use a few drops of paraffin as a lubricant, to ensure that the seal will have a smooth surface to run against. Clean the axle thoroughly and then carefully smear it with grease.
Adjusting End-Float
Re-fit the brake disc to the hub (where applicable) then replace the hub on the axle, reversing removal procedure. Non-adjustable bearing hubs will have a specific torque figure recommended by the manufacturer. The tightness of the nut and the thickness of the thrust washer determines the end-float of the bearings to a specific limit, which can vary between very slight pre-load (no end-float), to 0.05 mm clearance. The correct figure must be adhered to in order to achieve the proper setting. Manufacturers usually advise that the nut should then be rotated to the nearest split-pin hole alignment after the nut has been tightened to the correct figure.
The adjustment procedure of adjustable bearings varies according to the vehicle, but generally the end-float, which can be measured with feeler gauges between the inner track of the outer bearing and the thrust washer, is between 0.025 and 0.15 mm. The ideal is about 0.025 mm, but the limits are given as it is not always possible to get an ideal figure at the nearest convenient point at which a split-pin can be inserted.
The centre nut should always be tightened up to bed-in the bearings before checking, usually between 0.7 and 4 kg/m (5 and 301b/ ft.), at the same time revolving the hub. Spinning will also tell you when the bearings are tightening by the noticeable slowing of the hub. This is a good guide to tightness if you do not have a torque wrench. Slacken off the nut about half a turn or sufficient until you can feel a slight amount of play.
The easiest method of setting the clearance using a feeler gauge is to insert a 0.05 mm blade between the thrust washer and the inner track of the outer bearing cage. This feeler is thick enough to be able to push it to and fro to judge a firm fit. Nip up the nut by hand until this is achieved. You will now need to check whether a split-pin can be fitted through the slots in the castellated nut into a hole in line, or very nearly in line, with the slot. If the nut has a castellated cover arrangement, the cover should be tried on several positions to find the point where a set of slots is aligned, or nearly aligned, with the split-pin hole. If the thread is fitted with an adjusting nut and a locknut, the adjusting nut is simply held with one spanner as the top nut is tightened down.
After the new split-pin has been pushed into the hole, before bending the tails over to secure the nut, check with the feeler gauge to ensure that the smallest gap within the limits specified by the manufacturer has been obtained. If a feeler blade cannot be pushed down in between the thrust washer and the bearing, as will be the case with splined centre-lock hubs, check the end-float by rocking the wheel. There should be a small amount of movement at the hub. If the amount appears to be excessive, try to find a point where you can align the nut with another split-pin hole. This is a tricky adjustment, but bear in mind that on no account should the bearings be set in such a way that there is no play at all.
The golden rule for adjustable bearings is that there should be some play in the wheel to guard against expansion damage which could arise from the natural heating of the hub at speed. Once you are satisfied that the bearings are correctly set, a smear of grease inside the grease cap is all that is needed before lightly tapping it home. Replace the brake drum or caliper and disc pads, making sure that they are tightened to the correct torque as given in your manual or by a main dealer. Reconnect any brake pipes as necessary and bleed the brakes. Replace the road wheel - correct torque settings are important here - remove the stands and lower the car to the ground. Finally, take the car for a road test, then re-check the bearing adjustments.