In most older engines, the oil drawn into the
oil pump from the sump has to pass through a comparatively coarse gauze strainer; this prevents the large particles and sludge that sink to the bottom of the sump from entering the pump. There are, however, many finer particles and undesirable pollutants that find their way into lubricating oil: most of these are varnishes, gums, resins and acids, formed partly by oil decomposition and partly by condensed crankcase vapours; next come carbon, a by-product of combustion, and water from condensation formed in the crankcase when the engine is cold (carbon and water combine to form sludge).
Apart from this, particles of metal wear off all rubbing surfaces, especially when the engine is new; silica, or road-dust particles, may enter through the air filter or crankcase breather; finally, there are lead and iron oxides. The modern oil filter removes a very large percentage of all these contaminants, Up to World War 2, many engines were protected by the sump strainer only; then came the partial-flow filter, which cleaned about ten per cent of the total oil flow and effectively filtered the whole of the oil about ten times per hour.
From the 1960s on most manufacturers fitted full-flow filters, which are situated close to the outlet side of the oil pump. A by-pass valve, set to open at between 10 and 15 lb per sq in is often provided in case the filter becomes blocked. Early filters consisted of a roll of felt or flannel, but these were almost too efficient and tended to clog up prematurely, obstructing the oil flow. Wool, cotton waste, mineral wool, sisal grass and resin-impregnated fibre blocks have all been used as filters. Although some of these materials remained in use right up until the mid 1970s, the trend was to use a strong, resin-impregnated paper, pleated to offer a large surface area and therefore less resistance to the oil flow.
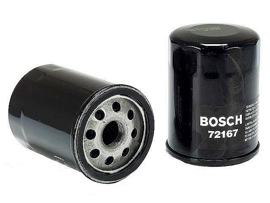
By the mid 1970s a typical filter offered 1000 sq in of filter area and retained particles down to 5 micrometres (five-millionths of a metre) in size. Support was given by a perforated metal container and strict attention was paid, during manufacture, to sealing the ends of the pleats. There was also a 'dual media' filter available, with a full-flow section of relatively coarse material and a lower velocity cleaning section for maximum retention of particles. There were two main forms of filter, the renewable cartridge and the throw-away canister, and there were many variations of both types. The simplest type was the self-supporting screw-in canister, which often protruded horizontally from the side of the crankcase.
Other types were fitted beneath a bracket housing the oil way connections, oil-pressure relief valve and
oil-pressure connection to a gauge or warning light. The filter was housed in a metal container secured, usually, by a long bolt from below. The container may hold a renewable cartridge or is often of the throw-away type. The centrifugal filter (more strictly, an oil cleaner) has an entirely different construction and method of operation. It was normally located behind the crankshaft pulley and relied for its effectiveness on particles being thrown outwards by small vanes to lodge among the sludge in the outer cavities of the cover. A strainer was included in the assembly.
Seals and Gaskets
In general, undamaged cork gaskets and similar flat items may be used again. When a rubber seal is used with a filter canister, a new seal is provided with the new filter. If this seal is of square section, make sure that it lies flat; also ensure that the old seal is removed -it sometimes lies in a narrow channel and has to be prised out carefully. Lightly grease both sides of seals or gaskets before refitting them. Examine any interior seals (not normally requiring replacement) to ensure that they have not deteriorated.
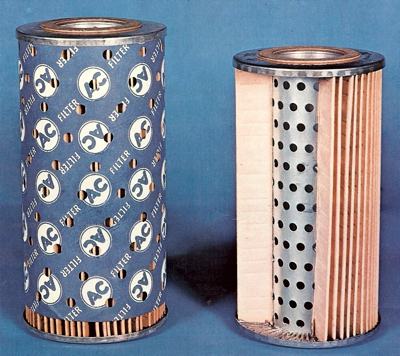
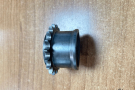
The paper type oil filter element. It is made up of a metal tube running down the centre, and the paper itself is usually impregnated with resin and is capable of retaining particles as small as 5 micrometres. |
Replacing Cartridge Filter
Unscrew the centre bolt and ease off the filter, taking care not to damage the gasket. Note the arrangement of any washers, spacers or springs that will be required on replacement. Discard the cartridge and wash out the container and fittings with petrol. Allow the parts to dry, before replacing them together with the new cartridge.
Replacing Throw-Away Filters
The vertical filter is unscrewed either by a central bolt or by a hexagon shape on the bottom of the canister. The smaller, horizontal type incorporates a screw fixing; it can usually be unscrewed with two hands, by use of a strap wrench or by piercing it with a screw-driver to gain extra leverage. The centrifugal filter must be dismantled for cleaning. This normally entails removal of the drive belt, crankshaft pulley and filter cover. The strainer and other components should be carefully washed in petrol, dried and replaced.
Testing
After replacing the filter unit, strainer and drain plug, fill the sump with the correct quantity of oil, then start the engine and watch the oil-pressure gauge or warning light. Pressure may take a little longer than usual to build up while the oil fills the voids in the new filter and the drained system. After a few minutes' run, examine the filter carefully for any signs of leaking oil; if necessary, reseat the filter after checking the seals, re-tighten and check again.
Renewal Period
Oil filters are normally renewed every 6000 or 9000 miles, or according to the manufacturer's instructions. Remember that however efficiently the filter removes dirt particles and other pollutants, it is not everlasting. A few pints of oil and a new filter are always cheaper than a damaged engine.