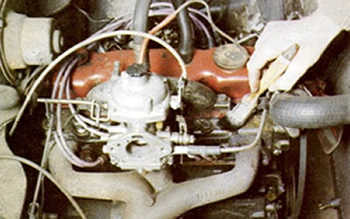
Test for air leakage into the induction system by brushing oil along the joint between cylinder head and manifold.
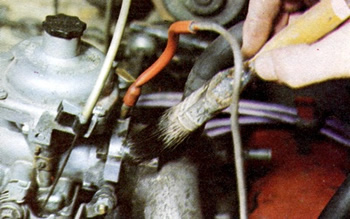
Repeat the application of oil via paintbrush with the carburettor. Leaks at either of these points will cause oil to be sucked in.
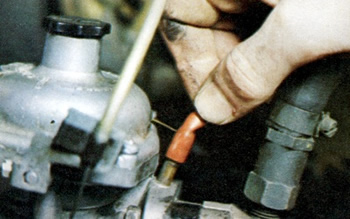
Disconnect all controls to the carburettor before removing it. The vacuum advance control is a plastic pipe with will pull off.

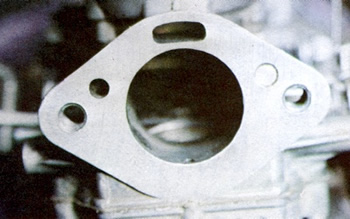
When a manifold gasket is replaced all traces of the original must be carefully removed. Take care not to scratch the manifold.

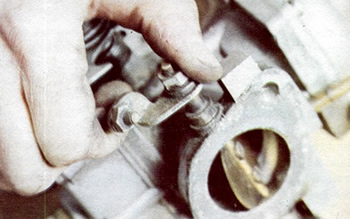
To test if the manifold has warped, place the edge of a steel ruler across the top. A dip shows that the manifold has warped.
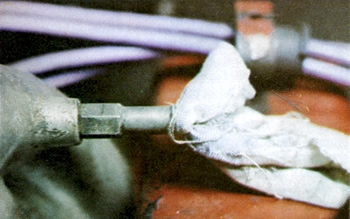
Blocking up the connection of a suspect hose will confirm if this was the cause of the leak.
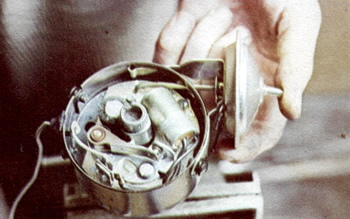
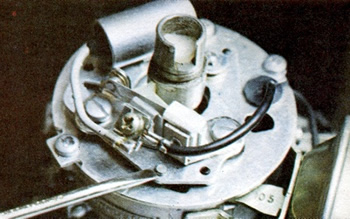
Lucas 45D distributor with one-piece contact breaker and non-adjustable vacuum advance unit.
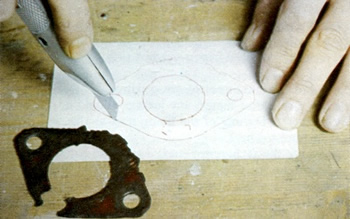
To make a new gasket, always use the old one as a pattern. It is hard to pierce the bolt holes cleanly.
The throttle spindle in most older carburettors turns in plain brass bearings. These can wear allowing air to leak.
To test the condition of throttle spindle bearings, grip the assembly and see if there is any up-and-down play in the spindle.
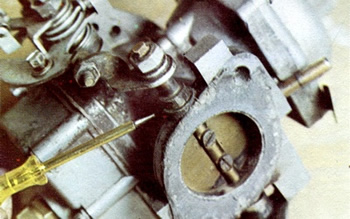
Testing the vacuum advance must be done with the plastic pipe disconnected. Then push the base plate forward with a screwdriver.

With the base plate right forward, wet the tip of your thumb and press it firmly against the spout on the vacuum advance.
Release the base plate. If it slides straight back the unit is broken. If you feel suction on your thumb it is working.
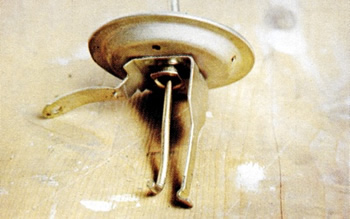
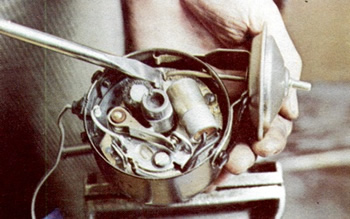
The vacuum-advance unit from an AC-Delco Carburettor. Most others from this era look similar - with the central arm linking with the base plate.

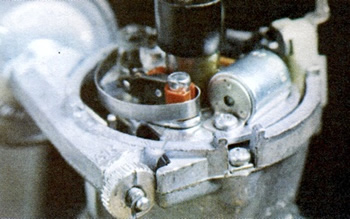
The vacuum advance on a Ducelier distributor is awkward to replace. The arm must go between the cheeks of the metal collar.
The main problem with the Autolite unit is removing the tiny circlip. Ease this off very carefully or it will spring away.
The Lucas distributor has a knurled adjusting nut and a small wire circlip on the same thread. Both must be removed.
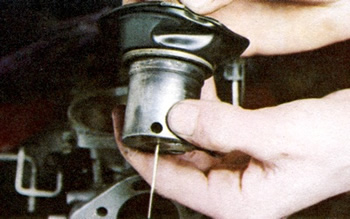
Stromberg carburettors are titted with a fine rubber diaphragm held by four philips screws. Remove these and the diaphragm.

Check the Stromberg carby diaphragm for splits, and replace it is at all damaged. Wash the diaphragm in petrol before replacing it.
Check that all the channels on the face are free from any obstruction. Be sure to prevent dirt falling into the carburettor.

The dash=pot on variable jet carburettors must be regularly re-filled. Failure to do this will produce poor performance. |
Introduction
When your engine is warmed up, it should run smoothly and steadily at all speeds. While turning slowly it will develop less power than when running at a high speed, but at no time should the engine cease or even partially cease to pull. If it does, this is known as misfiring or surging, while a sudden and violent loss of power is described as hesitation, or a flat or dead spot.
This can be caused by carburetion or ignition faults. The main ignition faults associated with this problem are defective spark-plugs and damaged HT leads. Carburetion difficulties include a flooding carburettor, the presence of water in the petrol, and insufficient petrol reaching the carburettor. Other causes include intake vacuum leaks and a faulty fuel/air mixture.
The nature of the fault itself can give clues to its cause. An ignition fault tends to be more abrupt as plugs fail to fire, probably periodically. Carburetion or fuel supply troubles, however, tend to be more irregular and can produce a more gradual loss of power varying with engine temperature. But there is a wide overlap, and no hard and fast rules are possible.
Induction Air Leaks
The carburettor and inlet manifold should be airtight so that air can enter the engine only by passing through the central bore of the carburettor. The reciprocating action of the engine attempts to draw air in greater quantities than the carburettor will allow and a partial vacuum is created within the induction system. It is on this vacuum that the carburettor operates.
If, however, any joints on the induction are not sound, air will be drawn in and alter the fuel/air ratio, potentially giving rise to engine missing or surging. Leakage of air into the induction system is most likely to occur at the cylinder head, manifold joint, through cracks in the manifold itself and at the joints connecting other pipes to the manifold. The carburettor mounting and spindle, the vacuum advance unit on the distributor and the air cleaner are also likely sources of leaks.
Tracing An Air Leak
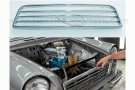
The first symptom of an air leak is the failure of the engine to tick over properly. The idle speed may fluctuate at random, or stalling may occur. The severity of the symptoms depends on where the air is entering and on the size of the leak. To trace this fault, remove the air cleaner to gain access to the carburettor and manifold. Start the engine and let it run at a speed a little faster than tick-over. Find the gasket joint between the manifold and cylinder head and, with a dish of motor oil and an old brush, spread oil along the gasket edge.
If there is a leak you will notice that the oil is drawn away. In addition, the engine note should alter for a few seconds. Lastly, the exhaust should give a puff of smoke as the oil is burned off. This will occur at the exhaust pipe; ignore any oil which may smoke on the manifold itself. If no reaction is noted here, repeat the test on any unions which pass into the manifold, around the connection points. Finally test again, by brushing oil on to the gaskets between the carburettor and the manifold.
Leaks At The Cylinder Head / Manifold Joint
If leakage was noted at the cylinder head, the tightness of the fixing nuts should be tested, since they have a tendency to work loose. This is due to the marked expansion and contraction that takes place in the area. If this is ineffective, then the gasket is probably faulty, To remove the manifold, all carburettor connections and connections to the manifold will have to be slackened. On many
engines, the
exhaust will also have to be disconnected.
The fixing nuts are then slackened so that the manifold can be detached. All traces of the old gasket should be scraped away from the manifold flange and the cylinder head with a sharp knife. A new gasket should then be obtained, coated with grease and placed on the head. Before refitting the manifold, clean it and examine it carefully. If cracks, holes or burnt areas on the face are found, then the manifold should be scrapped.
Cracks generally appear at stressed areas, such as the mounting flanges, but if you find a hole or crack at an unstressed point it may be possible to make a temporary repair. Thoroughly clean the damaged area and then coat it with a plastic metal compound. In cases where the inlet and exhaust manifolds are in one piece, a hole sometimes occurs between the two parts at a point below the carburettor. Remove the carburettor to check this. If a hole is discovered here it cannot be repaired and the manifold must be changed.
As a final test before replacing the manifold, put a straight edge (a steel ruler, for example) along the flange to check for distortion. This is often caused by over-tightening of the manifold. Hold the flange and ruler up to the light. If the flange is distorted there will be large gaps of light under the ruler. Use a file to remove any high spots, checking all the while with the straight edge to ensure that you do not remove too much metal. The manifold can then be remounted and tightened down evenly.
Leaks In Pipes Connected To The Manifold
If you find any leaks at pipe connection points, these should be unscrewed and coated with jointing compound. The pipes should be bent over to check for cracking. If they are cracked or perished, they must be changed. There are up to three flexible pipes connected to the inlet manifold. One operates the vacuum advance, one goes to the engine breather and there will be one for the brake servo unit on cars with power-assisted brakes.
The vacuum advance is dealt with below, but it is possible to temporarily remove each of the other connecting pipes in turn and to blank off the inlet with a piece of rag. If the car is then road tested, this will confirm whether or not the problem is cured. In the case of the brake servo, however, disconnection of the supply pipe will seriously reduce braking power so that any road test should be carried out with great care. If disconnection of the servo hose is effective, but no fault can be found in the hose, the servo itself Will need expert examination.
Leaks At The Carburettor Mounting
At the carburettor flange, any leakage should not be cured by further tightening of the fixing nuts as this will distort the carburettor base. Remove the carburettor and examine the gaskets. It may well be that fitting a new gasket will seal the leak, so try this before proceeding to more drastic remedies. As a temporary cure you can make up new gaskets from soft card, using the old parts as a pattern.
If such gaskets are coated with grease and installed, they will operate quite satisfactorily. If a new gasket fails to cure the problem, flange distortion may be the cause. Check again with a straight edge and use a file to remove any high spots from the manifold. When both the base of the carburettor and the manifold flange have been thoroughly cleaned of all traces of the old gaskets, the carburettor can be refitted on top of the new gaskets and tightened down evenly.
Spindle Wear In The Carburettor
The spindle and throttle assembly, which controls engine speed, runs on plain bearings in the carburettor body and has no lubrication as such, so continual movement will wear away the spindle and enlarge the bearings. Spindle wear is easily found by attempting to move the spindle up and down, holding the throttle lever. Extreme side play indicates that air leakage will be taking place and the only real cure is to change the carburettor. One possible alternative is to find a carburettor repair specialist who will reline the bearings and install a new spindle.
Faults At The Vacuum Advance
Connected to the carburettor base is a small diameter line, running to the distributor. Check that this line is sound and that the flexible joints at the carburettor and distributor are tight. To see that the vacuum advance diaphragm within the distributor is in good order, remove the distributor cap to gain access to the base-plate. Now remove the pipe from the spout on the bell of the vacuum advance unit - it will simply pull off.
Next push the base-plate forward with a screwdriver. With the base-plate pushed right forward, lick your thumb and place it over the spout from which the pipe has been removed. Press hard, to make a good seal, and take away the screwdriver. If the base plate springs straight back into position the vacuum advance should be replaced. If you can feel suction against your thumb and the plate moves back into position slowly the vacuum unit is in good condition.
Replacing The Vacuum Advance Unit
Almost all vacuum advance units are secured to the distributor by two screws, one each side of the vacuum unit. The means by which the vacuum housing is connected to the base-plate of the distributor differs considerably, however. Most link the two by a small arm but in some cases this arm runs above the base-plate and in others it runs below it. So the procedure for replacing the vacuum unit differs according to the make of the distributor.
Bosch Distributors
Bosch distributors have a white plastic condensation shield beneath the rotor arm. Both shield and arm will lift off. The arm linking the base-plate to the vacuum housing is clearly visible as it runs across the top of the plate and is secured by a small black circlip. Prise off the circlip with a screwdriver and ease the arm up and off the peg in the base-plate. Undo the screws on either side of the vacuum housing and lift out the entire unit. Some Bosch designs have a spring securing the connecting arm. This should be levered away from the arm.
Ducellier Distributors
The arm on this design also runs above the base-plate and is secured to it by a very small wire clip. Ease this off extremely carefully�it is all too easy for it to drop down into the body of the distributor. Next, undo the two screws on either side of the vacuum unit. Ease the arm free of the peg on the baseplate and pull the whole assembly away from the distributor. Replacing this type of unit is rather awkward. The eye at the end of the arm must locate between the two faces of the curved collar. Replace the clip carefully and tighten up the screws.
Autolite (Motorcraft) Distributors
Autolite distributors come in two types; one has the connecting arm under the base-plate, the other has it above. If you have one of the former, the first task is to remove the small circlip which holds the arm at its connection with the plate. Prise this off with a screwdriver but, again, be careful. It can spring off suddenly and if it does your chances of finding it again will be remote. Next, remove the two Philips screws which hold the base-plate to the body of the distributor.
These are directly above the spring clips which hold the distributor cap. Remove the screws holding the vacuum unit in place, lift up the base-plate and ease the unit clear. If the connecting arm runs above the base-plate, a similar circlip must first be removed. The base-plate does not need to be raised, so simply undo the screws holding the vacuum unit before lifting it away from the distributor. In both cases the procedure for fitting the new component is simply to reverse that for removing it.
AC-Delco Distributors
AC-Delco vacuum units have only one screw clamping them to the body of the distributor; this is on the left-hand side. The connecting arm is a thin rod, bent to locate in a hole in the base-plate. It is not fixed but can be levered straight out of the hole with a screwdriver. Undo the screw, disconnect the rod and ease the spring which secures the right-hand side of the vacuum unit away from its slot in the distributor casing. When replacing the unit, make sure that the connecting arm is pushed into position first.
Lucas Distributors
The vacuum advance units on
Lucas distributors are not i fixed to the distributor in the usual way, but are held by , one long bolt. On the other side of the distributor there is a knurled adjusting nut. First prise out the small wire circlip which is on the same thread and put it to one side. Then loosen the knurled nut carefully. As you undo it count the number of times the nut turns. In this case the connecting arm is a long, slender spring. Disconnect this from the base-plate and withdraw the vacuum advance, bolt and spring as one unit. Slide the replacement into position. Reconnect the spring and turn the knurled nut back on to the thread for exactly the same number of turns as was needed to remove it. Replace the circlip in the thread.
Air Cleaner Leaks
There is always the possibility that a previous owner of your car has discarded a blocked air cleaner and has not bothered to install a new one. The weakness thus caused could produce misfiring. In the same way, if the air cleaner has been replaced with a small 'sports' type filter, the weakness caused may produce running problems. Examination of the air cleaner is quite straightforward. First ensure that the rubber connection between the carburettor and air cleaner is sound. Within the cleaner check that an element is fitted and that it L of the correct type.
Faults In The Carburettor
Many causes of misfiring will be found within the carburettor itself, and the symptoms described can be caused by the carburettor flooding. Too much air reaching the carburettor can create similar symptoms. So the carburettor should be additionally checked as follows.
Missing Parts Or Loose Components
External examination of the carburettor will reveal whether any parts or permanent plugs are missing. Many carburettors have externally mounted jets and, due to vibration, these may work loose. So if any threaded holes are seen in the carburettor body, ask a carburettor specialist if such a part as a slow running jet should be installed at the point in question. In addition, carburettors are constructed with many cross-drillings and channels.
A lot of these are drilled from the exterior of the body and then plugged off with brass threaded plugs, or merely with lead shot, driven into the apertures. Any open channels should, therefore, be checked. An easy way of tracing air leakage into the carburettor is to run the engine and to pass a length of small bore tube around the carburettor while listening closely to the other end. If the pick-up end of the tube is placed close to any suspect area, the sound of ingoing air will be heard. If a permanent plug has come adrift, the required repair should ideally be undertaken by a carburettor agent.
Many carburettors are composed of three main parts: the throttle body, the main body and the cover. All of these are clamped together with fixing screws and have gaskets at the mating faces. Due to expansion and contraction, the securing screws may work loose, allowing air to enter. Also, if the gaskets are not properly compressed, they may be drawn inwards by air flow. Any leakage at any of these points may be cured by a new set of carburettor gaskets, together with re-tightening of the screws.
Accelerator Pump Faults
A sudden loss of power on acceleration (assuming that running is satisfactory at other times) will be caused by poor output or no output from the carburettor accelerator pump. All fixed-jet carburettors have such a pump, which injects an extra supply of fuel when the throttle is opened. With the engine off, operate the throttle while looking down the intake. You should see a strong jet of petrol issuing from a jet or tube close to the carburettor tube mouth. If no jet is seen, or if the jet is delayed, weak or diffused, first clean the pump jet and then trace back through the supply channels, to the pump diaphragm or piston and ensure that the mechanical action of the pump is correct.
Weak Mixture
Misfiring can also occur when the fuel/air ratio is incorrect. This may well be caused by obstructed jets and the carburettor should be carefully dismantled so that each air and fuel jet can be individually detached and cleaned. If the engine runs badly, but can be temporarily cleared by hard revving, this probably points to carburettor flooding, which in turn will be caused by a damaged float, or by bad seating of the fuel inlet valve.
Replacement of these components should produce a cure. If, on the other hand, the engine will run up to a certain speed and then loses power and holds at that speed, this may be caused by poor fuel supply. Ensure in this case that the inlet needle valve is not partially obstructed by dirt and that the fuei pump is supplying an adequate amount of petrol - there may be a blocked filter, for instance. Some carburettors have a filter in the fuel inlet pipe, above the inlet valve, which should be checked.
Motorcraft Carburettors
These procedures apply equally to all carburettors of the fixed-jet type, but when dealing with carburettors of the Motorcraft (Autolite) design, there are limitations as to the repairs that can be carried out. This type of carburettor is of a semi-sealed design and uses drilled holes placed directly in the main castings instead of the conventional removable jets found on other carburettors. The only detachable jet in the Motorcraft is the main jet, mounted on the underside of the carburettor cover, together with the inlet needle valve.
This carburettor can be examined normally for air leakage, fuel level and supply and main jet obstruction, but all other parts of the carburettor are pre-set. So it is important not to make matters worse by driving dirt into drillings which cannot be cleared. To avoid this, always clean the exterior surfaces of the carburettor scrupulously before dismantling and, when using air pressure to clear drillings, take care to blow the air in the reverse direction to normal flow through the drilling. In this way, dirt will be dislodged and not driven further into the carburettor.
Stromberg Carburettors
Variable-jet carburettors such as the Stromberg are of a simple design and are therefore easy to check for incorrect mixture supply. Flooding or poor fuel supply on most units of this type is dealt with in the same way as in a fixed-jet carburettor. On the Stromberg, air flow and fuel ratio is controlled by the air valve which rises and falls within the main bore. The height of this valve is decided by air flow through the carburettor, which acts on a sealed vacuum chamber at the top of the valve, the seal being made by a flexible diaphragm. Any small puncture of this diaphragm will cause the engine to miss and surge.
To gain access to the diaphragm, four screws which secure the diaphragm cover on the carburettor top must be removed. When the top is lifted clear, the air valve with diaphragm attached can be removed. Rinse the diaphragm in clean petrol and then gently stretch it, looking for splits or punctures. If any are found, the diaphragm must be changed, since it cannot be repaired. When the air valve is removed, the metering needle in its base should be examined.
If this is worn, as shown by score marks on the taper, this will cause the mixture setting to be placed in a false position and this could give a 'flat spot' when an unworn part of the needle enters the main jet. Both the needle and jet should be replaced and reset. Another point is to ensure that all apertures on the intake face of the Stromberg are not obstructed. These channels vent the float chamber and the air valve housing and, if obstructed, will prevent fuel being drawn from the float chamber or will obstruct the lifting of the air valve giving, in each case, poor running.
Low carburettor Oil Level
On all variable-jet carburettors, an oil damper in the carburettor top gives the required enrichment for acceleration. If the level of oil in this reservoir is allowed to fall, the enrichment will not occur, resulting in misfiring under acceleration. So the oil level in the damper should be kept topped up at all times, to the level of the moving rod within the housing tube. The correct oil should always be used - either motor oil, as used in the engine, or light machine oil such as cycle oil. Heavy oil such as gear oil should not be used as this will over-damp the air valve, causing excessive richness on acceleration.
Also see: How To Get Your Engine Running