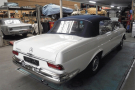
A second-hand MG of any type (and there are MG sedans as well as the sports two-seaters being discussed here) is not a used car - it is a valuable collector's item. As such it is expected that an MG should remain in good condition indefinitely, whereas a normal car is only required to last for perhaps 10 or 15 years. So unless you are prepared to spend vast amounts of money on restoration try and get a car which has a body in reasonably good condition.
Early MG's will almost certainly fall into two categories - restored to new - or even better than new condition, or in very bad order. The latter will probably be lying around gathering dust and dry rot in its timber frame while its owner gathers the initiative and the cash to proceed with the restoration. If you buy a restored car you will pay big money for it so it should be virtually faultless. If you are checking one in poor condition make sure there is not too much rust or rot in the body. Try to get a car which is as complete as possible, forfinding replacement parts can be a problem.
Problem Areas
Rust can be a real problem on early models so look carefully at the sill panels, the rear mudguards, the rear edges of the front guards as well as in front of the windscreen and in the floor of the cockpit. If the car has been driven hard then synchromesh on all gears, especially 2nd, may be worn - check by making quick up and down changes (cars before
1967 do not have synchro on first gear). If the clutch shows signs of slipping due to hard use, it means expensive repairs are necessary because the engine must be removed to replace it.
Cylinder-head gaskets can be a problem area so have a compression test carried out on the engine. Engine tappet noise is quite common and not usually a problem unless bad. On the Midget, check for rust in the floor, the door bottoms, sill panels and in the front and rear mudguards. Look for general wear and looseness in the
suspension as this is a common fault after hard use. Check the gearbox and clutch for smooth, quiet operation. Midgets were only sold in Australia in any number between
1968 and
1972.
General Tuning and Maintenance
Generally speaking, the smaller the engine, the more important it is that it be in perfect tune at all times. The more highly stressed it is, the more vital the above generality becomes. So it was with any and all MG's - they were small and, according to standards, developed miniscule power ratings, though entirely adequate to the job at hand. However, any power loss through faulty operation of any component, no matter how small the loss, represented a fairly high percentage of the engine's potential.
Where a power drop of three or four horses made almost no difference in a large engine, the same three or four horses lost from the MG were immediately missed. For this reason if for no other, proper tuning on these cars is vital if full enjoyment was to be had from their operation. When an MG was right, it was really right; when it was wrong, it was awful. A sporadic plug or an out of synch carburettor that would hardly be felt in a larger car made the MG run well below par.
General Upkeep
For the benefit of those owners who have lost their owner's Manual or who bought their MG without one, we will explain the basics by the gospel according to the workshop manual.
Every 400 kms: Check the oil level in the crankcase and replenish if necessary. Do not overfill.
800 kms: Grease
steering swivel pins and tie rod ends. Also apply the grease gun to clutch and brake pedal shaft. Check
tyre pressures (especially if natural rubber tubes are used-these leak).
1,600 kms: Grease all fittings and inspect the oil level in the gear box and rear-end. In the TC for normal conditions use 140 weight gear oil and 90 weight in all others. For extreme cold below -12 degrees use 90 and 80 respectively. Replenish the carburettor dash-pots with 10-W oil if necessary. Check brake fluid and
battery water.
5000 kms: Drain the crankcase and refill with proper oil - generally 30 weight in the summer and 20 or 20W m the winter if temperatures drop below 0 degrees.
Thoroughly lubricate the distributor, paying attention to the rotating arm and the automatic advance. Smear a small amount on the breaker arm pivot and the cam.
Be careful, though, not to over-Lube any part of the breaker-plate mechanism, or points may be fouled.
Also check the following: generator belt fuel pump points, distributor points, and clutch pedal travel. Adjust any or all if needed.
10,000 kms: Remove filters from carburettors and fuel pump, and replace. Replace the
oil filter on TC's and early TD s; on late TD's, TF's, and MGA's replace the filter element. Grease tach drive gearbox. Go easy! Drain gearbox and rear axle, and refill with proper oil noted above. Remove front wheel covers and, depending on model, grease to hub nipple or pack grease cap. Check tappet clearance.
Check wheel alignment.
20,000 kms: Remove oil pan. Clean the pan and the internal
oil filter of sludge. While the pan is down, It might be a good idea to check for bearing wear at connecting rod Journals – there shouldn't be any at 20,000 but there might well be at 40,000, especially if the car has seen hard use. Replace the pan with new gaskets and seals and fill with fresh oil.
Check the shock absorbers for fluid content and wear. Refill or replace the unit if necessary. If you haven't done so long since, replace the spark plugs. Drain and flush radiator. Lube rack and pinion on TD through MGA. On TC the
steering sector box should be filled with 140 gear oil every 3,000 kms. The grease nipple on these boxes is not the whole story, though it should be used as well. This information is not necessarily to be accomplished by the individual owner, although much of it can be taken care of through the use of the equipment that comes with the car.
The major operations could be handled by a competent mechanics that were capable of catering to foreign cars, or by the local MG dealership. These check-ups are basic and should have been made if the car was to give a full term of service. The MG in all variants were made to last virtually forever if given proper care - and they have. Every MG since 1929 had been so greatly over designed that many very early ones are still running around and maintained as the factory recommends.
Doing It Yourself
Unfortunately the tool roll in the 1600 Mark II and later models contained a reduced assortment of wrenches, compared to earlier cars, but if you have American tools they'll fit most of the nuts and bolts on late MG's. About the only one of the above items that will cause the backyard mechanic any difficulty on the MGA and MGB is
oil filter replacement. It's best to have a friend standing by to help with this. A funnel and a length of small diameter rubber tubing facilitated filling the transmission.
The front shock absorbers could be topped up the same way, while your friend rocked the car up and down. The rear shocks had to be dismounted for refilling. If you could, get one of the "grease guns" from the earlier MG tool kits. These had often been tried and discarded by owners because they "don't work." The reason they ddin’t is that they're not grease guns but oil guns, ideal for refilling the rack and pinion
steering gear with hypoid oil.
It was all too easy to forget completely about the twin six-volt batteries hidden behind the seats, where they got wet and dirty. From
Lucas you could get a handy
battery filler that helped you add water without overfilling. With the "B," MG stopped supplying a starting handle, useful more for setting the crank position for valve or point adjustment than for starting the engine. Fan belt life on the MGA varied from short to satisfactory. Replacements were provided by American makers. If you couldn’t find MGA listed, check under Metropolitan and Austin A-55. Belts for certain Ford six-cylinder trucks and for the Volkswagen, through 1960, will also fit.
Carburettors
Nothing made more difference in the running of the MG (any model) than the proper setting of the two
SU carburettors slanting out of the side of the head. And no part of the MG had been the subject of more curses from harassed owners trying to keep up with temperature variations and the unpredictability of the synchronisation linkage connecting them. Some unhappy owners had gone so far as to insist that the carburetion that was running perfectly in sunlight went haywire by the light of the moon, implying that the difference in light alone creates the hazard. Not so, if things were handled properly.
Like any multiple carburetion set-up, the SU's on the MG could get out of whack over a period of time, but not between sun down and sun up. They also had several points in their favour. For one thing, these carburettors were almost immune to dirt in the jets, a real headache with some other varieties. Another plus factor was the variable carburettor air inlet which gave the best mixture range possible throughout, particularly if you had the patience to experiment with the wide range of needles that were available.
Working on the carburettors as were installed on the car, i.e., setting and synchronizing them, was a different thing entirely. It was a simple screw-driver and wrench operation that didn’t take more than fifteen to twenty minutes if the carburettor was in good shape internally and that the float level was correct. All that was required was to turn the jet adjustment hexagon nuts to their topmost position not tight, just snug. You had to then hold the mixture control out to open the jets, start the engine (which you should have been warmed up and completely checked out ignition-wise before starting the tuning).
Next step was loosening the spring clamps on the bar connecting the two carburettors so that they worked independently of one another. This was important, since you could set the carburettor with the clamps tight but they wouldn’t stay set. Next was the turning of the throttle set screws (slow-running screws) on each carb to produce a steady 1000rpm. Then, with a small, narrowbladed screw-driver, you had to lift the plunger 1/6 of a centimetre on one carburettor and then the other. In each case the engine should have faltered and tended to die.
Next you had to carefully turn each jet control hexagon down one-half a turn or three flats. In each case you had to do the lifting bit again and listen for the engine falter. Chances were that it would still hunt or falter this time. If it did, turn each nut in turn down one flat at a time until the engine showed no sign of the previously noted miss. If you had gone too far, the engine would tend to speed up slightly when the
piston was lifted. If the increase was very slight, this was the condition you were looking for, so the thing you had to do was to jiggle each hexagon slightly until the same effect appeared on each carburettor. Treat each carburettor separately, lifting and turning until the ideal was reached.
At this point the engine speed might have fallen below 1000rpm; if it wasn’t much below 900 rpm, you should have left it alone. Otherwise it had to be brought back up by carefully adjusting each throttle screw. At this point only you had to tighten the spring locks on the throttle shaft, being careful not to twist any portion of the shaft as you did. The carburettors should now have been in complete synchronisation and should stay that way for months. If the weather turned very cold or very hot, you could turn the hexagons one flat rich or one flat lean in either case, but you had to be sure to turn both the same amount and together; otherwise the setting could be lost entirely and the whole tuning process would have to be repeated.
The SU's on TF's and later MG's had small plungers down under the right side of the
piston chambers. These could be pushed up slightly to lift the
piston for tuning without removing the air cleaner and air manifold. Otherwise it may have also be necessary to make an additional adjustment a flat or so on the lean side to compensate for restriction in the cleaner element. Regular maintenance could include the removal of the vertical housings and pistons for inspection and cleaning with a rag to ensure that they were moving smoothly. More than one rough-running MG had been traced to a grain of sand that was jamming a piston.
Do not use abrasives on the pistons or housing, which did depend on very precise clearances for proper operation. Just as critical were the adjustment and replacement of the needle valve and seat assemblies in the float bowls, but this again was a matter for specialists. If they were out of kilter, you could tweak plungers till the cows come home, with no results at all. There was a thimble-type filter in the float bowl fuel line connection which could be flushed out occasionally.
The same was true of a cylindrical filter in the base of the SU electric fuel pump, which also seemed to have caused MG owners considerable grief. You could greatly elongate the life of the pump by removing the black plastic cover (unscrewing the terminal and the nut underneath) and running a clean scrap of card between the exposed points while pressing them together. They deserved just the same sort of cleaning and adjustment you gave your ignition system.
Distributor
About once every 5,000 kms or so if you were inclined, it was a good idea to give the distributor a going over. Nothing added that final touch to a smooth-running, high-revving engine as much as a distributor that was right. What was wanted was a perfectly running instrument - a goal that was easily attained with the neat and simple Lucas distributors on the MG's. Unless you know exactly what you're doing, you should not remove the igniter from the car; if it was not necessary, you could end up thoroughly out of time. Removing of the cap and unscrewing the high-tension and coil leads and inspecting the inside of the cap for cracks and burned contracts. If cracks were found, a new unit was indicated.
If the contacts were scorched (and no cracks found), you should dress them lightly with a knife or file - do not gouge, just scrape. Also check the central carbon brush to make sure that it was free to slide and was snug in the pressure spring. Open the breaker points by hand and check to see if they show any signs of pitting or offset contact with one another. If they were right, check the gap; and if all is right, you should leave things alone. If not, you could have removed the movable point and the fixed point and dressed them on a flat oil stone, being careful not to get any slant on either point.
The points could be replaced and checked to make sure that the pivoted point swung at a level which allowed it to meet the fixed point squarely, neither above nor below. Also if you checked to make sure that the faces met flush by carefully bending the tang that carried the fixed point if the faces didn’t match perfectly. Rotating the engine so that the distributor cam opened the points fully and then setting the fixed point to produce a gap of .03 of a cm. As a final check, you could rotate the engine so that each lobe of the cam opened the points and measured the gap in each case. A variation of a thousandth was permissible.
With your fingers, rotate or rock the entire breaker plate assembly to make sure it was free enough for the centrifugal advance to turn. Then after checking all electrical connections, both high and low tension, reassemble the unit and reinsert the high-tension leads, making sure everything was tight and snug. This was strictly for the more enthusiastic owner who wanted to be sure his MG stayed in the shape its makers intended. Such maintenance would more than repay the owner in enjoyment. There was however a different breed of owner who drove a different breed of MG.
Not for him was the happy 100 kph to 120 kph of neither the T-Type nor even the occasional 160 kph of the MGA and the brisk but hardly fierce acceleration they possessed. For him and others like him there was more - a lot more, in fact. Let's see just how much there was and how fierce the MG could really be.
Performance Modifications-XPAG and XPEG
Eventually in the life of every MG there came a time when its current owner took a long look at it and said in that tone of voice that spoke of a special form of dissatisfaction known as "power hunger." It wasn’t that the near-hundred or so horses that live under the hood weren’t willing – it was just that there were not enough of them. There was something about the MG that demanded the treatment of the speed crafter. The MG in its several variants had piled up the largest score of records of any marque in the world, and one of the reasons for this is that the car started life as a hot rod, and its makers remained hot rodders for some time.
All too frequently the attitude of car makers had been one of discouragement to those interested in adding to the number of horsepower built into their products. Not so with MG, whose engineers did not hold speed secrets to themselves alone. What followed came directly from the racing division of the MG factory. There were many ways to skin a cat and just as many ways to soup an MG. Some worked well, and some easily resulted in bits and pieces of good English metal being scattered about the local countryside. What followed has proved to be the best way to pump power out of the MG with little danger of metallic mayhem if the car is properly driven.
The MG engine was much like the beloved old flathead Ford V8. First, it was plentiful; second, relatively huge amounts of power could be pumped through it without disaster; and thirdly, the total cost of the full-house engine rarely exceeded $600, even when the special factory hot rod block was used. Later ones pumped 57bhp at 5500rpm. Most of this difference - which, believe it or not, could be felt - was due to a change from 3 cm
SU carburettors to a set of the same make with 4 cm venturii, coupled with a raise in compression of 3/4 of a point or a jump from 7.25 to 1 up to 8 to 1. Slightly stiffer outer valve springs were also used. The XPEG engine differed from the late XPAG only in bore size, a core change allowing a bore of 7.2 cms used in that block as against the 6.65 cms of the earlier model.
In virtually all other respects the XPAG and XPEG engines were the same, even unto the stroke. Flywheel horsepower of the larger stock engine was listed at 63 at 5000rpm, though careful balancing and selective assembly eased this up to about 65 maximum at 5200rpm. One of the nicer aspects of the pre-1956 MG engines is that power increases could be made in small, easy stages governed mostly by the energy of the builder and the state of his bank account. There were actually five operations, or stages, of power increase for either engine, the final or full-house treatment delivering about 85bhp at 6300rpm on 90 octane fuel. With alcohol this last operation could produce well over 110bhp at the same rpm figure, using the smaller 1250cc engine as a base of operations.
Also see: MG Heritage |
MG Performance Chart