The Core
We all know what the radiator does. But dissipating heat is not the easiest of jobs, particularly here in Australia, and ensuring the temperature is kept a little above boiling point has proved problematic for many foreign makes that have travelled our roads. The science or art of getting the temperature of an engine correct is set partly by the size of the radiator and partly by the pressure valve in the filler cap. Together, these two components have to control the engine temperature over a wide range of working conditions, in conjunction with the thermostat.
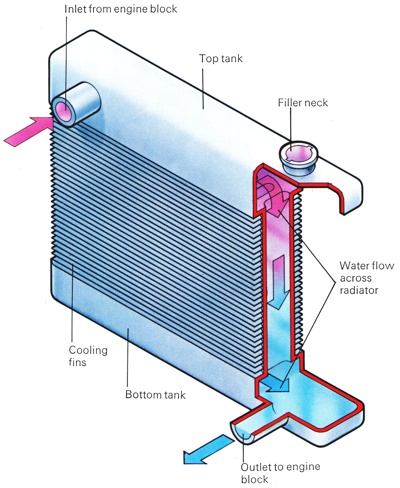
Smaller radiators used for the interior heating system and, occasionally, for oil cooling are usually similar in construction and action. The heart of a radiator is the core, mounted between the top and bottom tanks. This core consists of a large number of narrow vertical tubes, through which the hot water falls. Fins, often corrugated, are attached laterally to the tubes to support them and to increase the cooling area so that the heat can more easily be transferred to the surrounding air.
Air Volume
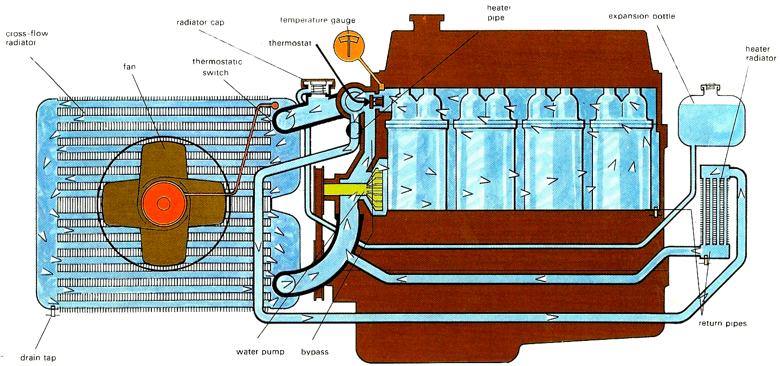
The volume of the air passing through the radiator is increased by an engine-driven or, in the case of modern cars, and electric fan and, when the radiator is mounted at the front of the vehicle, by the car's forward motion. There were two types of radiator core in general use; in both, the various elements have soldered joins. The tube core model has water-carrying tubes, supported by regularly spaced horizontal fins. The tubes can be of any cross-sectional form, although a narrow ellipse shape provides the largest cooling surface. The other type has a cellular core, in which the water passages are formed by mating together a large number of crimped metal ribbons, with additional horizontal fins to give rigidity.
Air is an important part of the heat transfer process because it takes the heat away from the radiator. Air heats up relatively quickly - therefore in order for the radiator to continue to transfer heat to the surrounding air effectively, the heated air must continuously be replaced by cool air so that the heat transfer process can continue. That’s why the radiator is located behind the grill at the front end of the car. As the car moves, air flows through the radiator and continuously "takes" away heat. However, when the car is not moving or when natural airflow is insufficient, a fan pointed directly at the core forces more air through it and more heat is transferred.
That is why it is essential that the material used for the core is a good heat conductor: it must be strong although thin, it must be easily worked, because of its intricate design, and it must not rust or corrode as the result of contact with the cooling water or anti-freeze solutions. These requirements were usually met by the use of brass water channels, with copper firming in between - although these days manufacturers instead use aluminium. Although aluminium radiator cores have less effective cooling properties, they are lower cost to produce as Copper prices continue to rise. Past attempts to use aluminium material ran into difficulties over welding or brazing the delicate component parts - but as technology improved manufacturers perfected a successful method of making joins using modem adhesive bonds.
Copper vs. Aluminium
The reasons for using aluminium instead of traditional materials are largely economic - both the supply and price of aluminium are far more stable than those of copper. The heat-conduction properties of aluminium are almost equal to those of copper, and aluminium has one big advantage - it is much lighter. One early radiator consisted of a number of vertical brass tubes, each surrounded by a spiral of thin copper 'frills', soldered into place. Sometimes, the 'frills' were replaced by other copper foil shapes, while a few vehicles relied on plain tubes alone. Another kind consisted of a honeycomb, built up from a multitude of short, round capper tubes, laid horizontally, with half an inch or so at each end pressed into a hexagonal shape like a box spanner.
These tubes were assembled in the required dimensions, then all the mating hexagonal sides, back and front, were soldered together. With flat sealing plates at each side, water was able to flaw through the interstices, from tap to bottom, between the round sections of the tubes. The air passed at right angles to the water flow, through the tube centres. On vintage and veteran cars, a solid threaded filler cap was used, often bearing the maker's badge or motif. Occasionally, a thermometer was fitted, visible from the driver's seat. Today, the filler cap has a function additional to that of sealing the
cooling system.
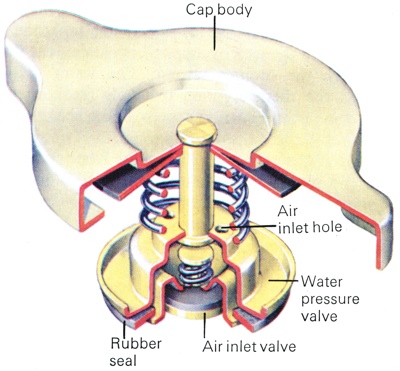
Radiator pressure cap, as found on most older cars. The large spring controls the blow-off pressure, the other regulates the air-intake.
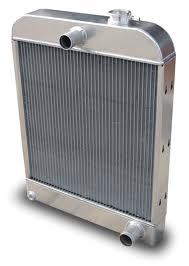
A radiator as found on most older cars.
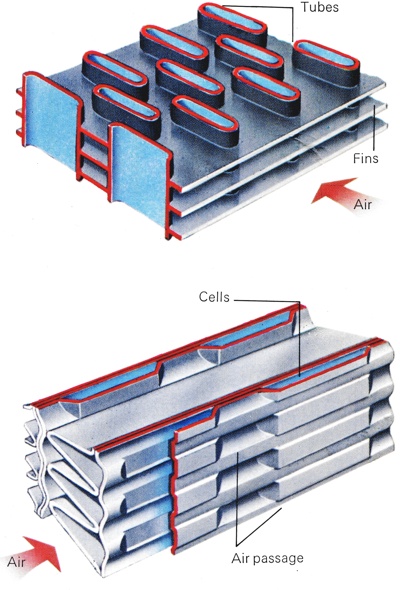
Radiator core close-up, at top the tubular type, below the cellular type. |
The Radiator Cap
Two spring-loaded valves form an integral part of the cap. The larger valve sets the correct
cooling system pressure, and hence the designed operating temperature. The pressure (in pounds per square inch) obtained by a particular valve is stamped an the tap of the cap. When the cooling water is heated, the pressure in the system rises and eventually the valve opens, air and water are discharged through the overflow. When the water cools, the pressure falls and a vacuum farms. This is relieved by the smaller valve, set in the bottom of the cap, and air is drawn back into the
cooling system. If the overflow is piped to an expansion tank, any water discharged is collected on heating and returned on cooling. In the late 1960s and early 1970s it became more common for manufacturers to use an expansion tank linked to the radiator filler cap, thus forming a semi-sealed system. As the tank is never normally more than half-full, only air is discharged.
The only faults likely to develop with a radiator are leaks, blockages or a defective filler-cap valve seal or spring. It is possible to repair leaks to the top or bottom-tank seams by soldering but, if the core is leaking, it is usually safer and more satisfactory to take the radiator to a specialist repair shop or to fit a replacement. A temporary expedient is to pour into the radiator a proprietary preparation that hardens on contact with air - that is, when it seeps out through the leak. The filler-cap valve seal can be checked if the engine is run until warm. Cover the cap with a cloth and gently release the cap. A hiss should be heard; if it is not, the need for a new cap is indicated. Be sure to match the replacement as indicated by the number on the top of the cap.
Back-Flushing
Blockages can affect both the air and the water passages. Insects, leaves and other debris lodge in the air passages, but can easily be removed by water pressure from a hose-pipe directed against the inside of the radiator. Scale is unlikely to form in the radiator, but loose scale from the engine may lodge there. This can be removed by back flushing - directing a hose-pipe against the bottom-tank outlet until clear water flows out from the top. Remember that, although a radiator looks sturdy, its component parts are very delicate and we would always recommend you handle with care!
Radiator Repair
The most widely used system for cooling internal combustion engines uses water or a similar liquid coolant. As the coolant circulates through the engine it picks up the heat produced by the combustion process, then loses it to the atmosphere. The radiator is the unit on the car where this transference of heat takes place. As they are made of metal - usually steel, brass, or a mixture of the two - radiators are prone to rust. Only a few survive the life of the car without requiring either repair or replacement at some time
Long before rusting results in a leak, internal deposits often cause the radiator to become blocked. If this is so bad that flushing the radiator with a proprietary compound fails to clear the blockage, replacement of the radiator will probably be necessary. Before you can remove the radiator from the car you must first drain the
cooling system. This job is straightforward on most cars, but some cars have
cooling systems which are sealed, and these units are usually a little more difficult to work on.
Draining A Conventional Cooling System
If your car has a conventional unsealed system then drain it as follows. Park the car on level ground and switch the heater control on the dashboard to the 'on' position. If you have recently filled your
cooling system with anti-freeze you will not want to waste it, so have a suitable container ready to catch the coolant as it drains out. Your handbook will tell you the capacity of your system so that you can obtain the right sized container. Remove the filler cap. If the engine is hot, use a large rag and undo the cap only gradually to let the pressure out slowly. Otherwise the sudden drop in pressure will cause the water to boil instantly and gush out, most probably scalding your hand.
Nearly all cooling systems on cars in current production have drain plugs or taps located somewhere in the base of the radiator and the engine block. Undo these and allow plenty of time for the coolant to drain out. If you cannot find the radiator drain plug, or if it looks rusty and liable to shear, then you will have to detach the lower radiator hose. Draining the block as well may not be necessary but is good policy: while you are going to the trouble of replacing the radiator it is worth giving the whole system a flush through. In order to drain the block you will have to undo the drain plug in its base. The position of these plugs is variable so you will just have to hunt around underneath the engine until you find it. Once all the coolant has drained away you can begin the job of removing the radiator.
Draining A Sealed Cooling System
Draining a sealed
cooling system, as fitted on Renaults, is a more lengthy process. As when draining a conventional system, the car should be on level ground with the heater switched on. Because these systems are sealed, expansion chambers are fitted to allow for the expansion of the coolant as it heats up. These chambers usually take the form of transparent bottles and unscrewing the safety valve on this chamber is the first step. When you have done this you can remove the radiator drain plug. Wait until the coolant is flowing out freely then undo the radiator cap. On the bulkhead there will be a bleed plug which you should now undo. Draining the block is then the same as on the conventional system.
Removing The Radiator
Although the methods by which radiators are attached to cars vary in detail, the general procedure is basically the same on most vehicles. On many cars, particularly newer ones, the first step is to disconnect the electrical connection to the thermo-s witch. There may also be another wire to be disconnected if the car has an electric cooling fan. Sometimes the electric fan will have to be removed altogether. If so it is generally a matter simply of undoing a few bolts. Label these wires to avoid mixing them up, and tape them out of the way. If your radiator has a cowling it should be removed next. These cowlings are almost invariably just bolted on in three or four places and are easy to remove.
Next disconnect the hoses. All radiators will have both top and bottom hoses, and radiators which are part of a sealed system will have a third hose connecting to the expansion chamber. Some cars, particularly those with automatic transmission, may also have oil cooler pipes attached to the radiator. They too should be disconnected. All hoses are held in place by wire or Jubilee clips which are simply unscrewed to allow the hose to be slid off. If your hoses are retailed by wire clips it is a good idea to replace them with Jubilee clips, which are less likely to cut into the hose rubber and cause leaks. Once all the connections have been undone and removed you can begin to dismantle the radiator. Theoretically this is almost always simply a matter of undoing a few bolts, but in practice difficulties often arise because of the inaccessibility of the bolt heads. Some bolts for example can only be reached with a long socket spanner poked through holes in the radiator grill.
If when you remove the radiator you find that it is mounted in rubber bushes, examine them for wear or signs of perishing. If they have deteriorated at all, renew them. In practice they seldom wear much but they can perish away and if this happens the radiator will become loose and rattle in its mountings. With the radiator out of the car it is a good idea to give the rest of the system a flush through. First you will have to remove the thermostat or else it will prevent the cold water from circulating. This is usually under a round cover on the cylinder head. With the thermostat removed place a hosepipe into the opening and with as much pressure as possible force water into the block. Doing this for a few minutes should flush away any dirt or rust particles which may have settled in the system, and which could build up into a blockage.
Servicing The Radiator
When you have removed the radiator you will have to decide what you are going to do with it. If the problem is a blockage and flushing the system fails to clear it, before buying a new radiator try 'reverse flushing' the old one. Direct water from a hose pipe at the greatest possible pressure into the bottom hose connection. The blockage may be forced out through the top. Obviously a really serious blockage may be impossible to shift. If this is the case then it is an indication that the radiator is seriously corroded on the inside and replacement is the only solution. If the radiator has a slight leak and you are going to attempt repair, first give the radiator a good cleaning with a brush and a proprietary engine cleaner, then hose it through with water. This should remove all the road dirt, leaves, and dead flies which will undoubtedly have caked on.
Curing a leaking radiator will depend largely on the size of the leak and its accessibility. Small leaks can often be gummed up by using a liquid radiator sealer. Larger more serious leaks will require a more permanent repair. Soldering is the ideal repair if the leak is in an accessible place, but you will have to weigh up the cost and difficulty of repair against the price of a replacement unit. Bear in mind that if the radiator has rusted through in one place, it is probably about to go in several other places too, so repair would only be a temporary measure. A cheap if temporary repair may be possible with a resin filler. This is applied in the same way as in repairing holes in bodywork.
Obviously your chances of success will depend largely on where the repair is to be made and how serious it is. If the leak is relatively small and accessible, this kind of repair, if done properly, could provide the ideal quick and cheap solution. If you have repaired an old radiator, before refitting it give it a thorough flushing through in both directions. This will remove any dirt or rust which may be present on the inside, and which could later build up in the radiator and lead to a serious blockage.
Refitting The Radiator
Fitting the radiator back into the car is simply a reversal of the removal procedure. Any old looking hoses should be replaced, for hose failure is one of the commonest reasons for car breakdowns, yet one of the easiest to avoid. The hoses should be firm and flexible. If they are soft or have hardened to the point of cracking, they should no longer be considered reliable. Similarly, you should replace any of the drain plugs if they look at all rusty. Once you have reassembled the system it can be refilled. As with the draining operation this job is quite simple on conventional systems but is considerably more complicated on the sealed systems.
Refilling A Conventional System
The refilling operation on a conventional system begins with replacing the drain plugs or closing the drain taps, depending on the design used. Most systems are refilled through the radiator. Pour in the coolant slowly to avoid the possibility of airlocks forming in the system. Manufacturers recommend the use of rainwater but tap water is the usual alternative. Continue filling the system until the level remains constant at the top of the radiator. However carefully you fill the system there is still a good chance that an airlock or two will form somewhere. These must be removed or you will run the risk of the engine overheating. The heater is a likely location for an airlock to form owing to its position in the system. You can check for an airlock here by removing the heater hose and filling the system until the coolant flows out of the hose.
When the system appears to be full - and the job can take quite a long time - replace the radiator cap and run the engine at fast idle speed for a few minutes. You must let the engine heat up or the coolant will not reach a sufficiently high temperature to open the thermostat valve and begin to circulate through the engine. When this point is reached, switch off the engine and carefully remove the radiator cap to recheck the level. Top up if necessary. On certain cars the
cooling system is not filled through the radiator cap, but through an expansion tank similar to those found on sealed cooling systems. Begin by refitting all the hoses and drain plugs as before, but leave the hose from the expansion tank disconnected. Fill the system slowly to avoid the possibility of airlocks forming, until the coolant starts to run out of the disconnected hose. When this happens, reconnect the hose as quickly as possible, and fill the expansion tank until it is about three-quarters full. Replace the cap of the expansion tank and tighten it down.
Turn now to the filler plug hole. Pour in more coolant until the level reaches the bottom of the filler-plug threads, refit the filler plug, and run the engine. Once the engine is warm, switch off and remove the expansion tank cap. This operation will relieve any pressure in the system. If the coolant level has dropped, as it probably will have done, refill the expansion tank so that it is just over half full.
Refilling A Sealed Cooling System
Refilling a sealed
cooling system is a little more complicated than refilling a conventional system. The reason is that these systems are not vented, and no air must be left in them. The system must therefore be bled before it is closed, just as brake hydraulics are bled after work is done on them. These systems are not usually refilled with water, even in summer, but with a water anti-freeze mixture. Remember also that if your car has an alloy engine you should fill the
cooling system only with a glycol-based anti-freeze or you will damage the engine. Normally there will be a big label somewhere on the underside of the bonnet giving you the specific information on the type of anti-freeze to use and the correct dilution. If there is no label, the information should be contained in your owners manual.
Start the job by refitting the drain plugs which you removed from the radiator and the block, checking that the radiator plug still has its copper washer. Then fill up the expansion bottle for which you will probably require a funnel, as its opening is generally rather small. Fill the bottle to just above the maximum mark, but do not overfill it. Then refit the safety valve. The rest of the coolant can then be tipped into the radiator. Check that the heater is still switched on. The bleed plug or plugs should still be closed. When the radiator is completely full start the engine and run it at a fast tick-over. Continue to refill the radiator as the coolant level drops. As you fill up the radiator open the bleed valves. The coolant which flows out of them should be totally free of any air bubbles. When it is, close them up tight. Fill the radiator right to the top and put the cap on. Turn the engine off and allow the system to cool down. Finally, when it is cool, recheck the level and top up if necessary, making sure the radiator cores are covered.
Also see: Radiator Repairs